In November 2024 I launched a new website to put into a single place all the stuff on which I spent my time at work and in parallel activities like sketching things or mapping for fun. That last point was a fun thing I started to rescue from my external drives files that doesn’t fit into work nor doodles either.
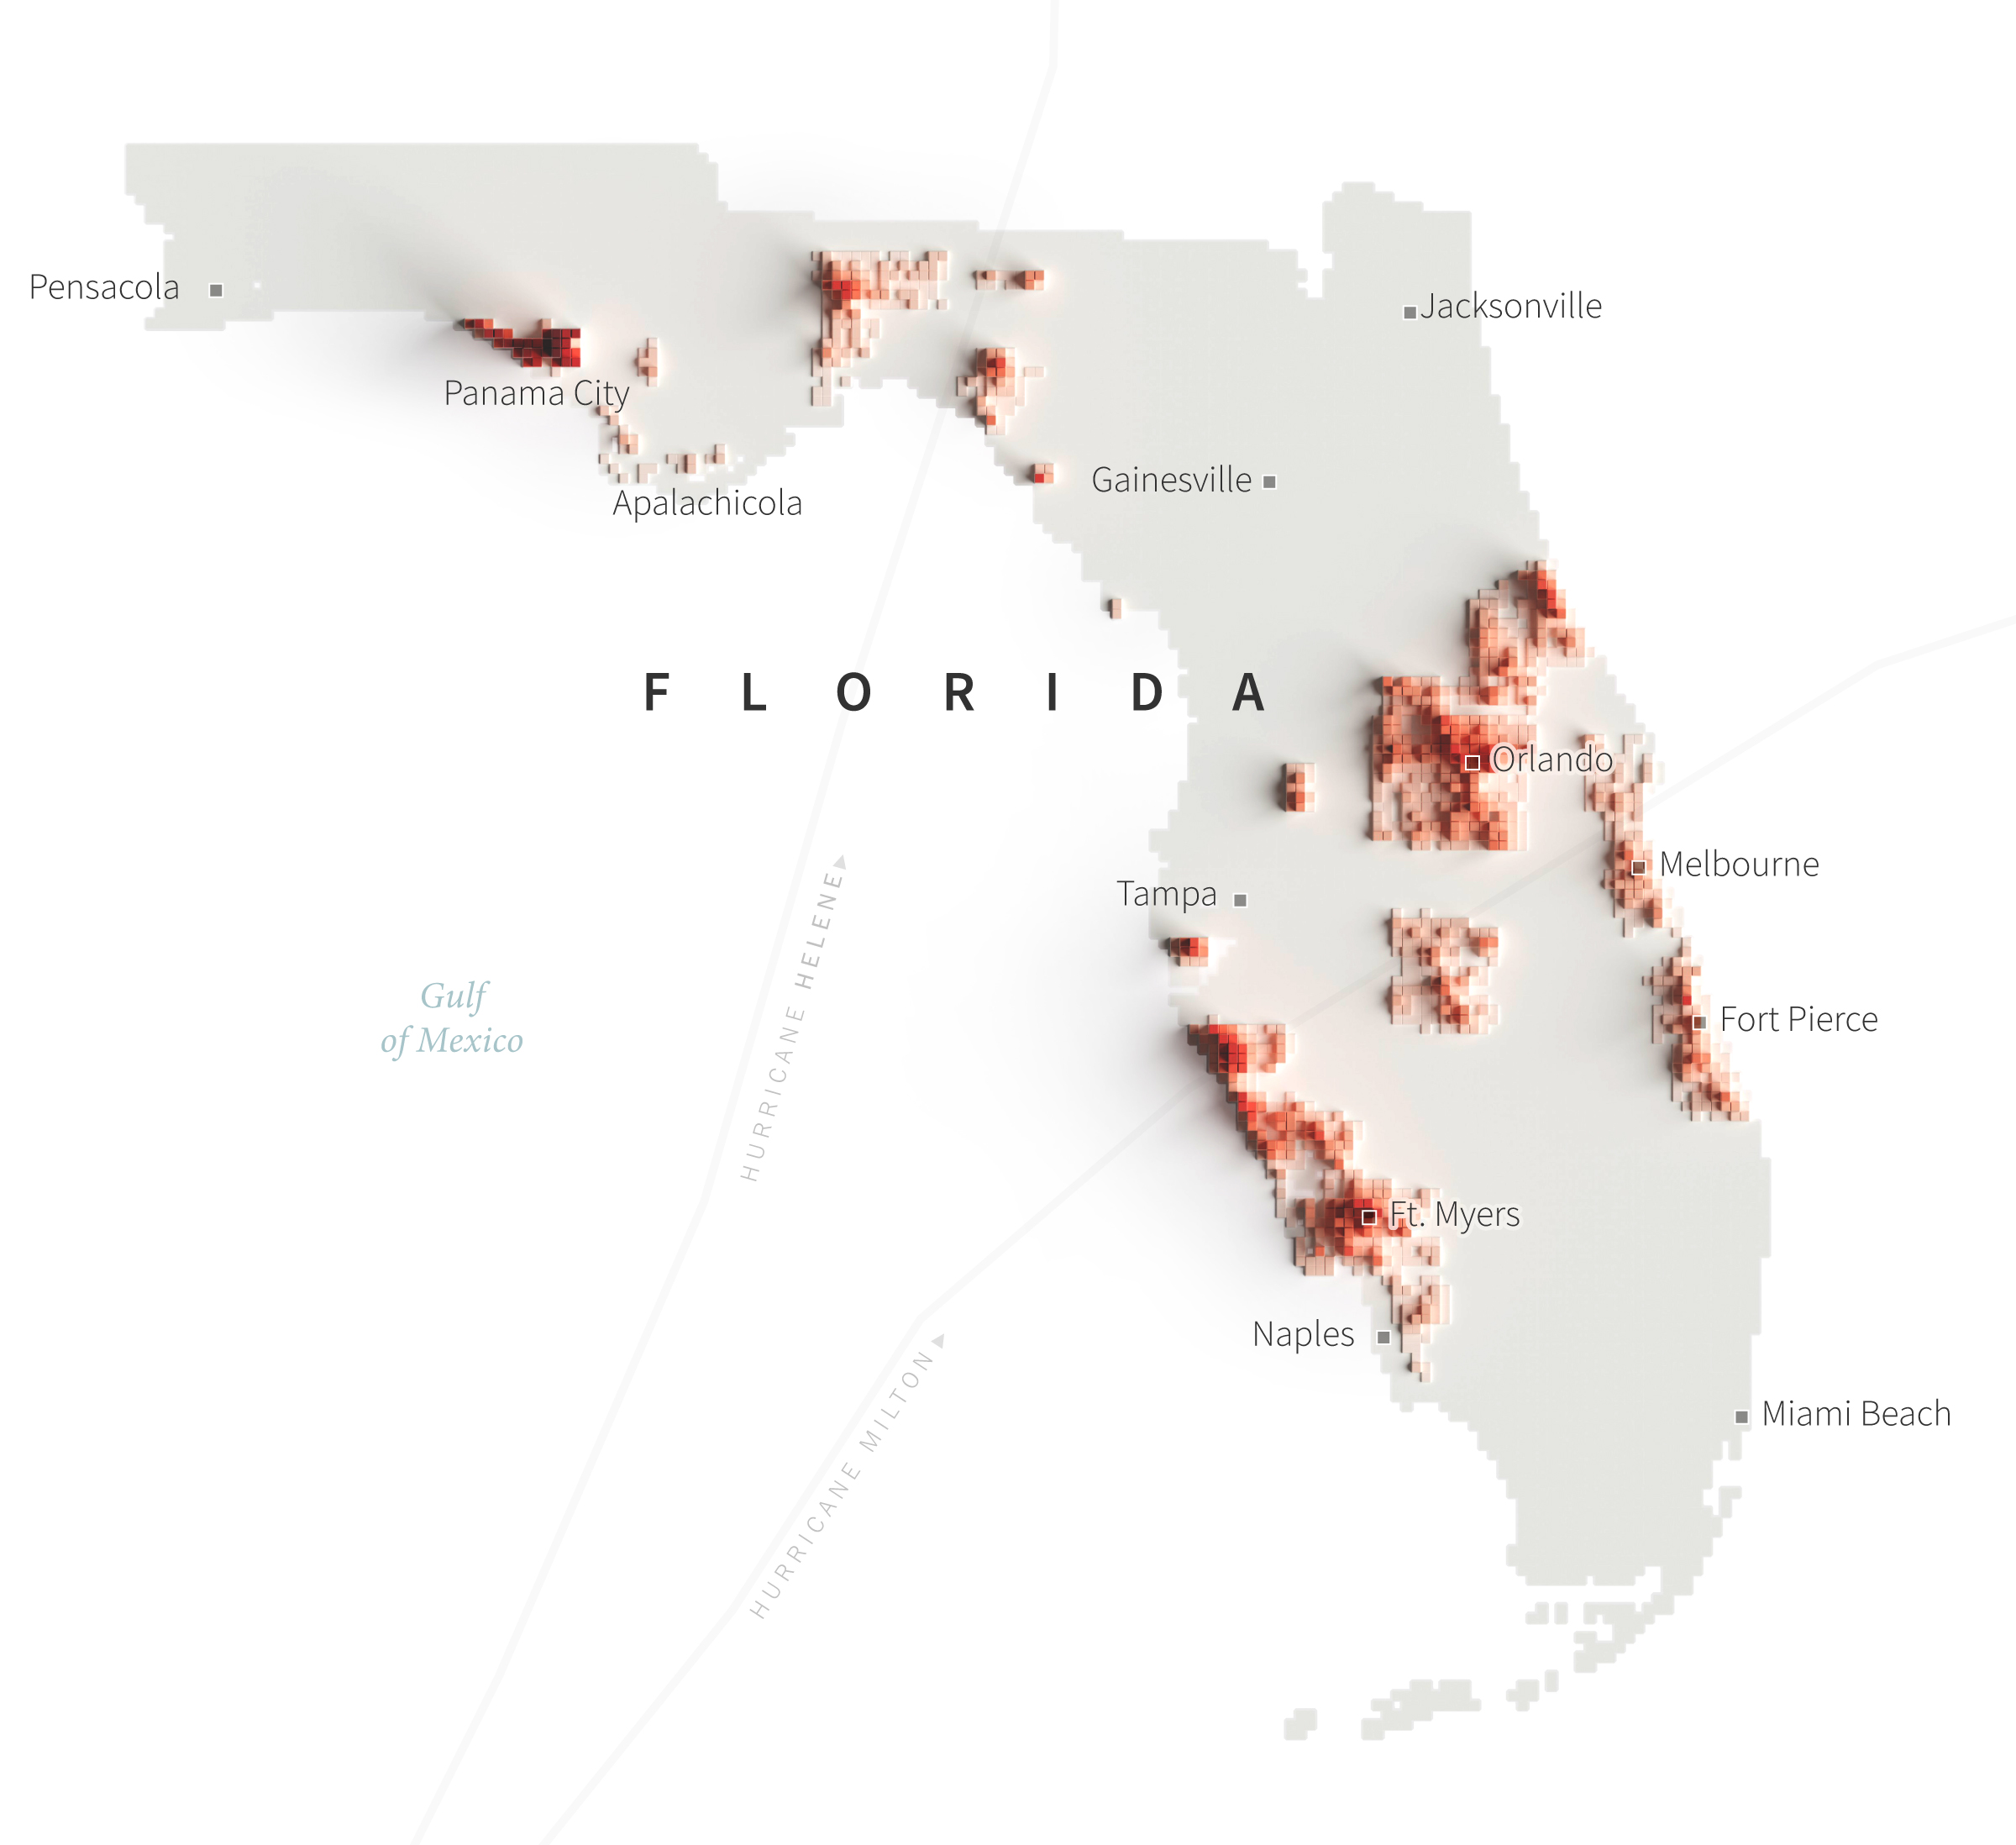
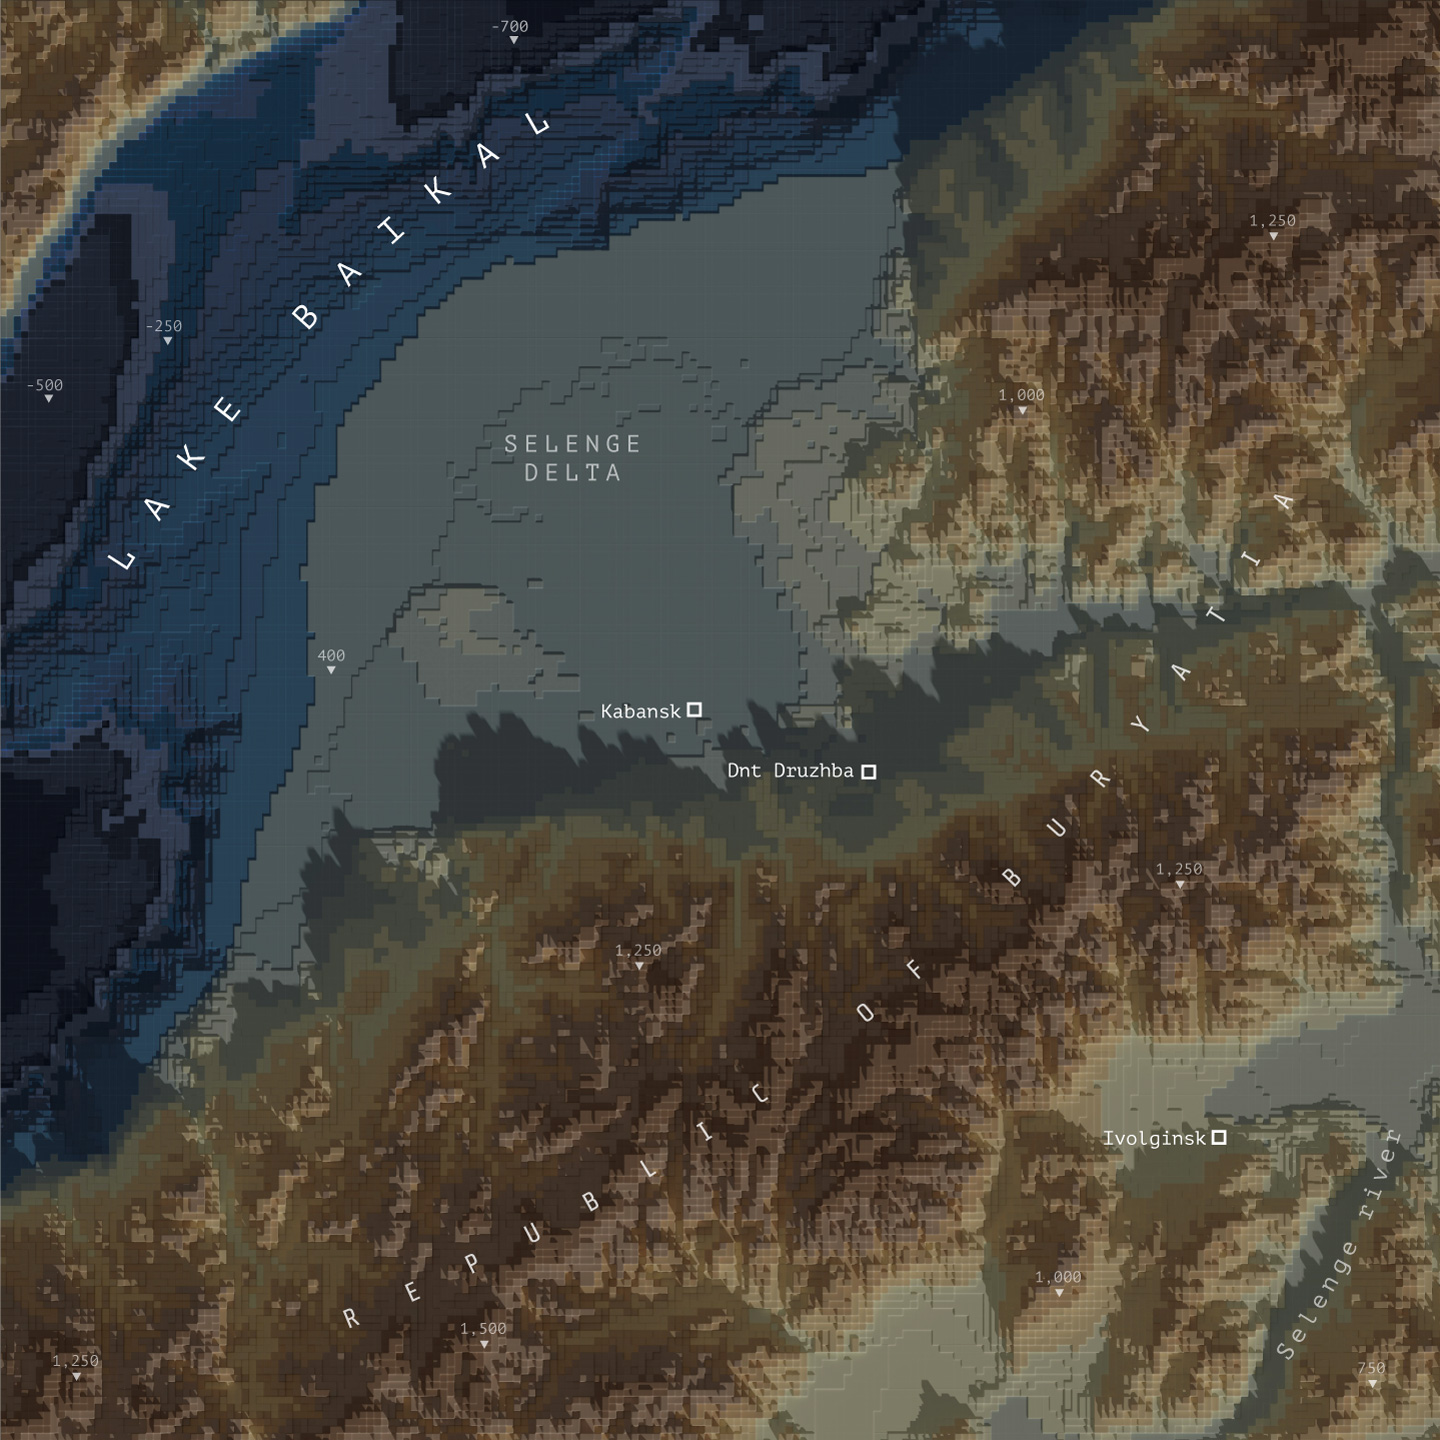
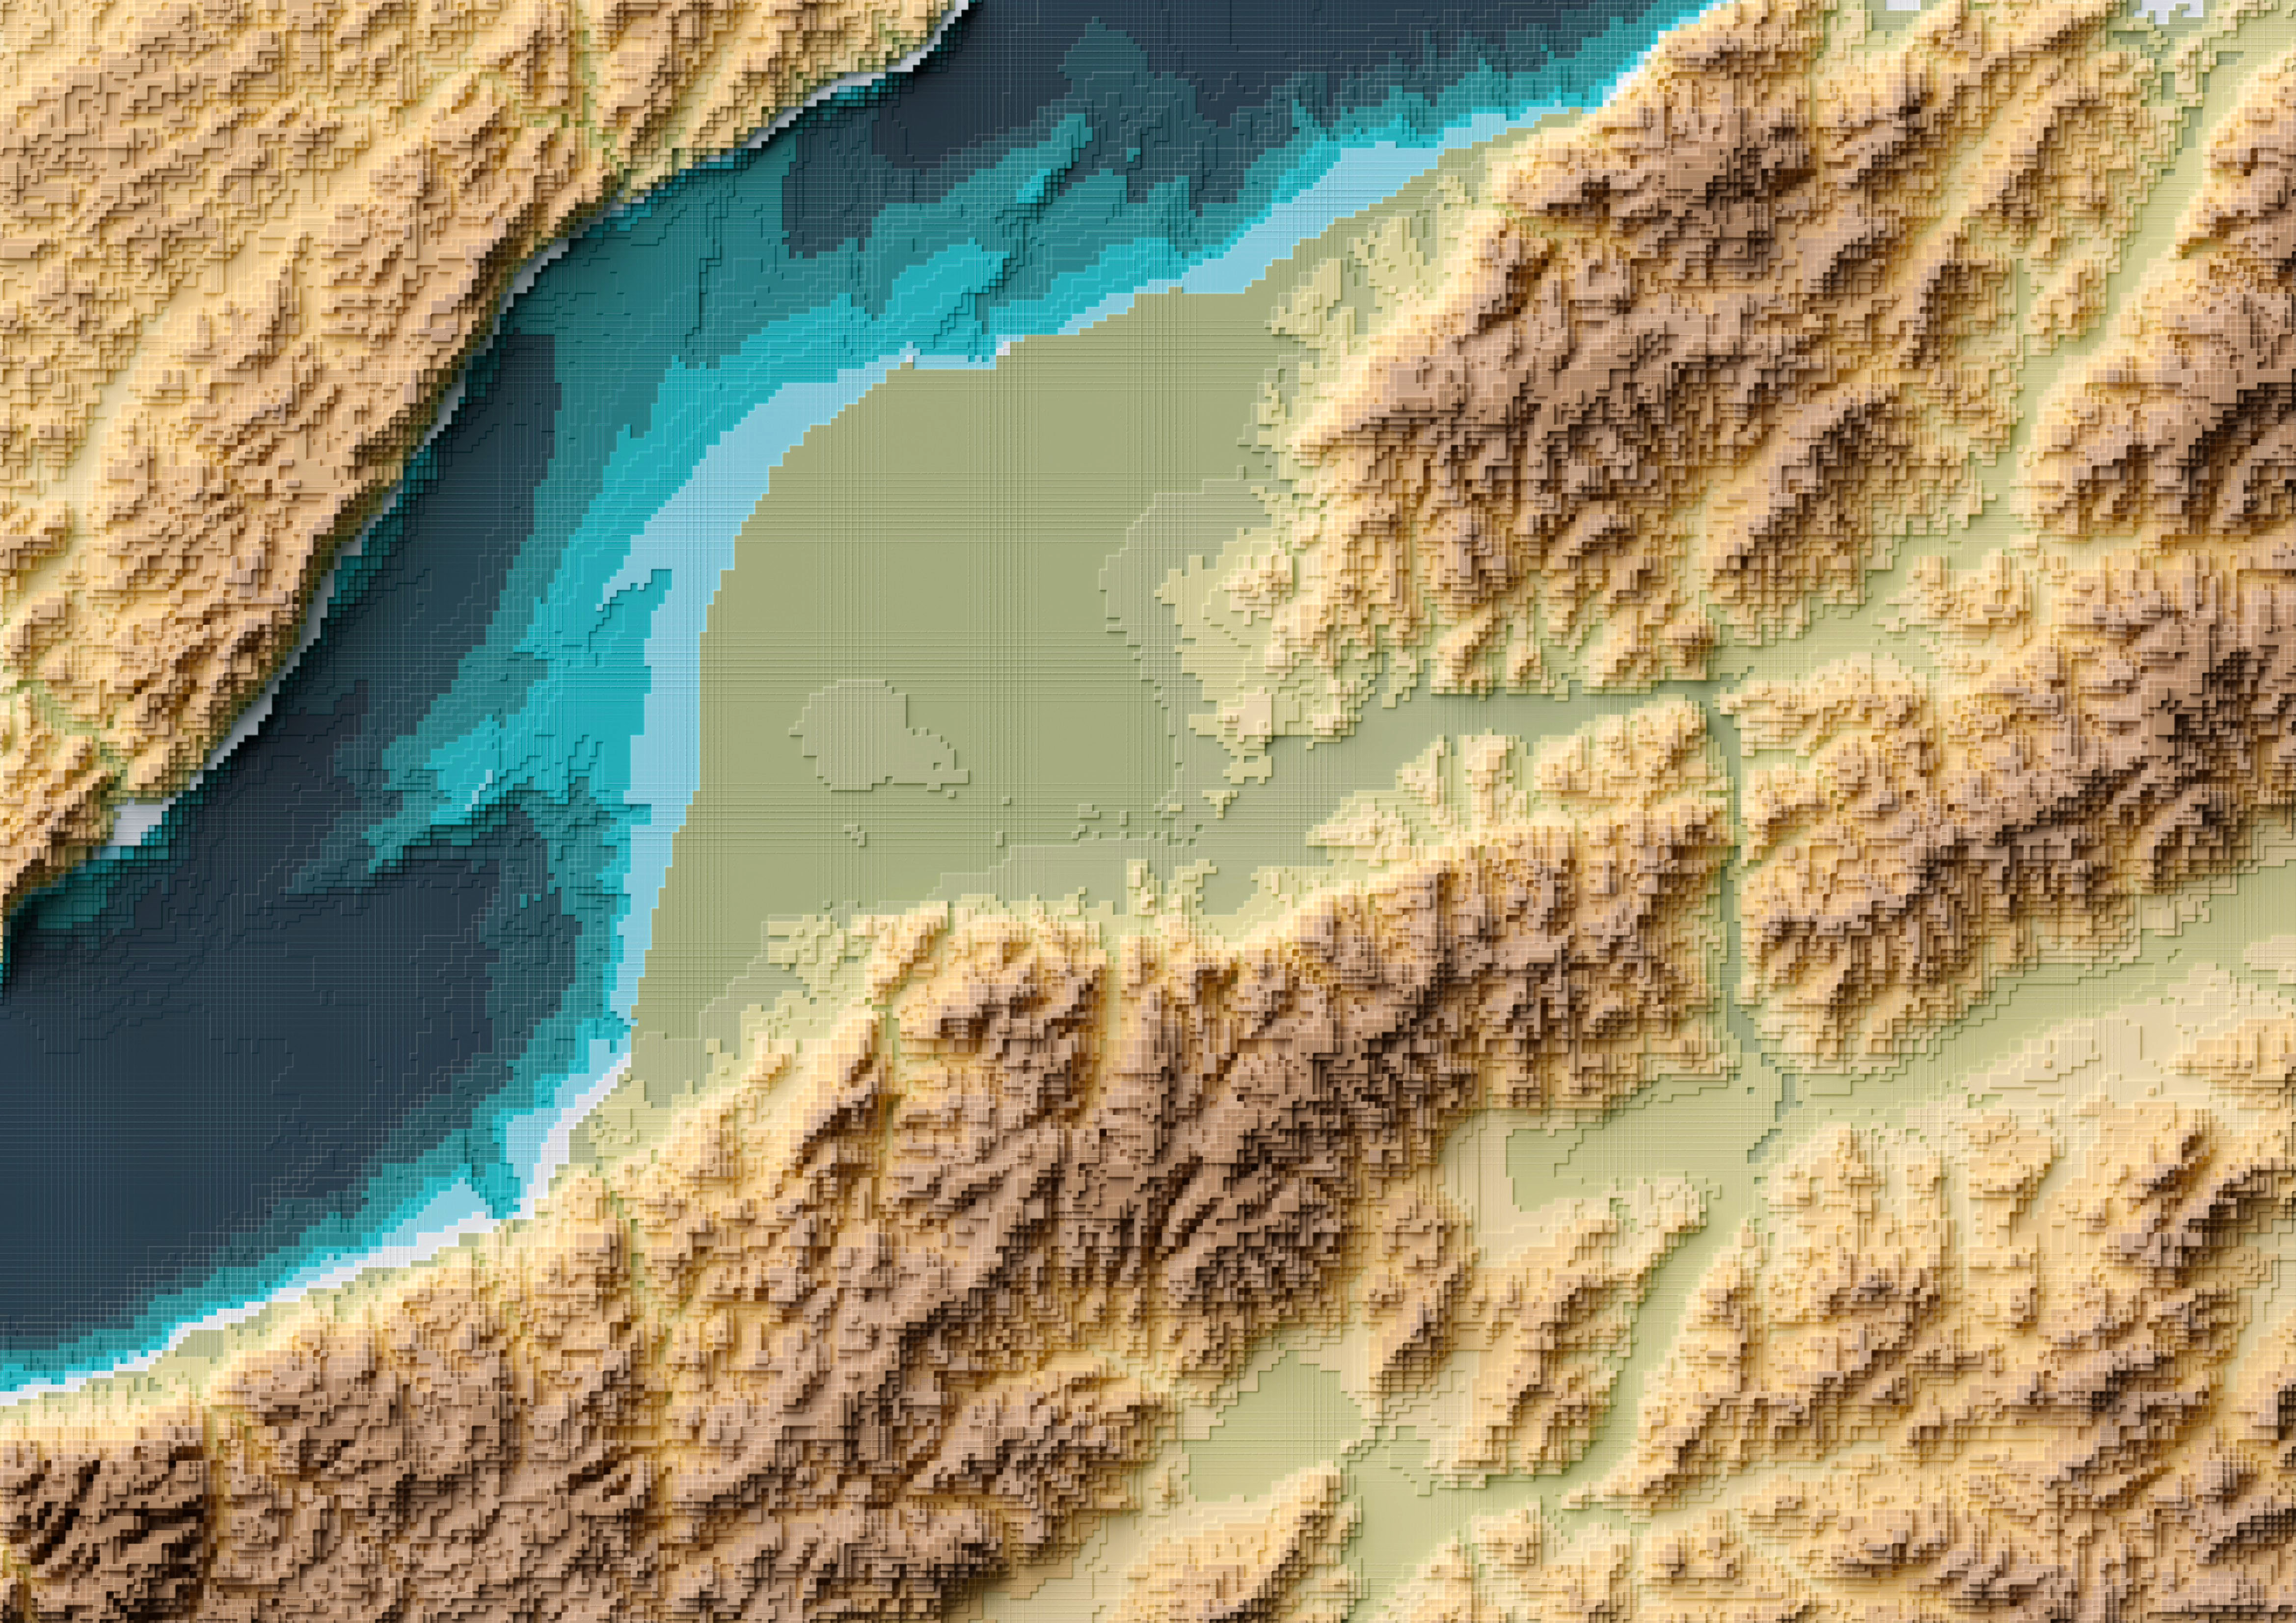
Eventually I was able to hang there a few more pieces, all in different styles from personal explorations of data and tools. This tutorial meant to explain how I used QGIS, Blender and little optional touches of Photoshop and Illustrator to create a voxel like map like the one below:
Please note that I’m doing this in good will, I’m not offering any corporate endorsements of the following procedure, software companies or resources, even on open source resources I mention here. Likewise I’m offering this without any warranties or compromise of further assistance.
🎁
Follow me step by step or get the files ready
Here you can find the files ready to use, download the packs and set you render to go, or follow me below to produce the data and render your own. If you are downloading the files, skip to the section titled “Set up the render” and choose either plugin or image input.
Defining the AOI and getting data
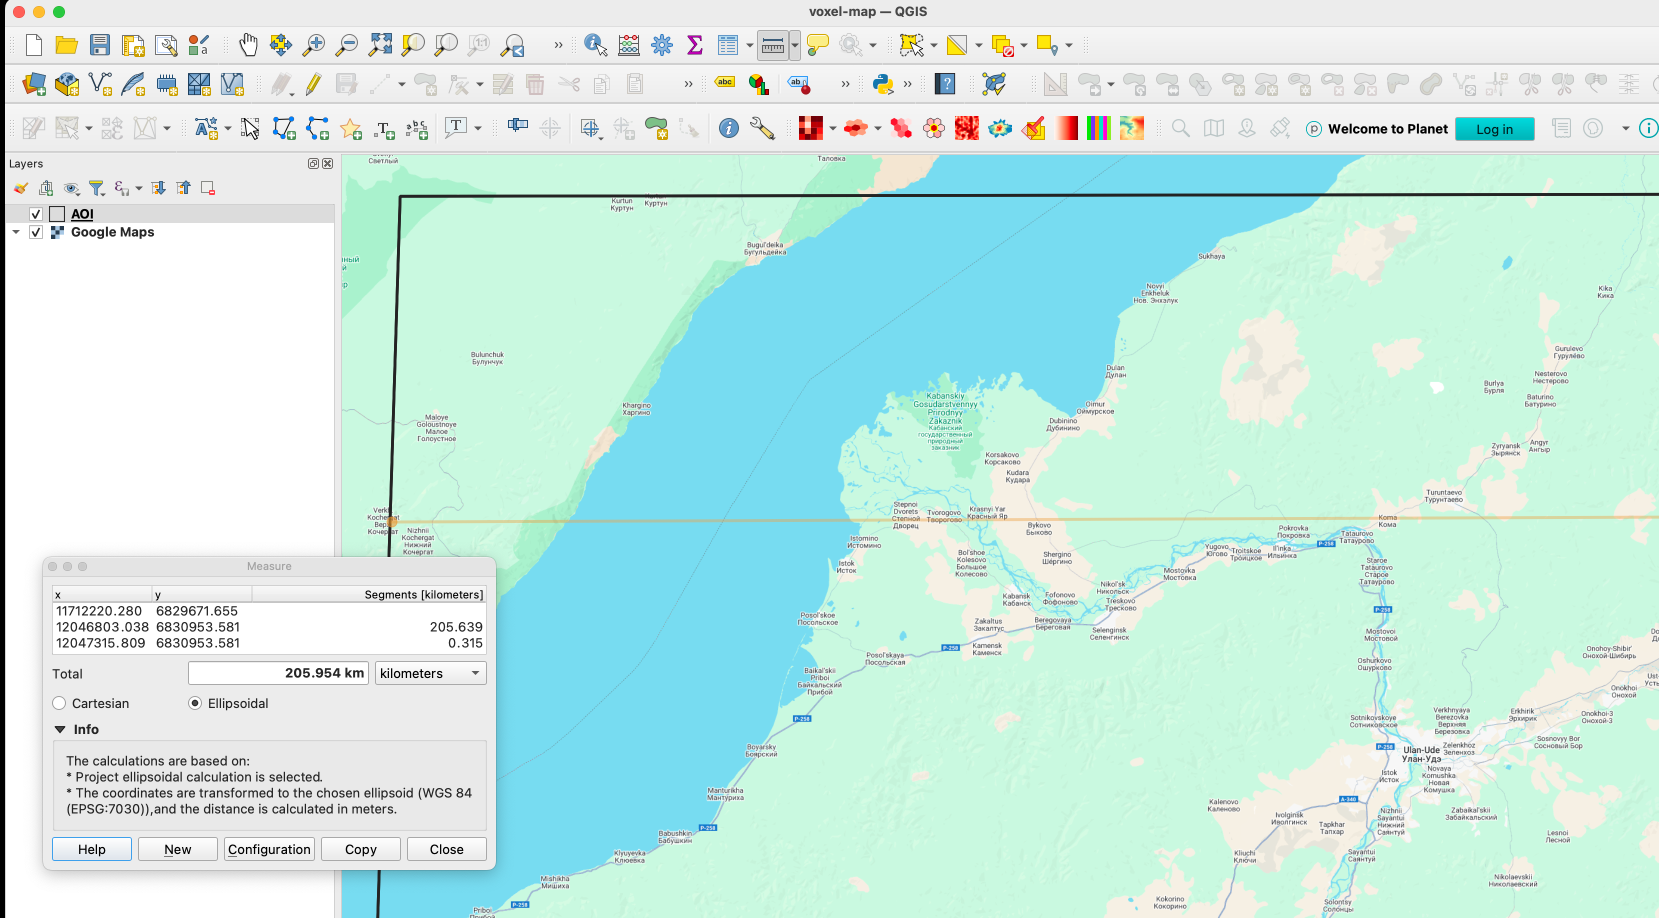
I usually start defining the are I want to work on adding first an xyz layer on my blank project on QGIS. If you don’t have that set up, check this link first, and then come back, it’s a quick set-up anyways. Once you have that done, zoom into the area you want to map, create a new scratch layer to define your area of interest (AOI), we will use it as a reference for many things.
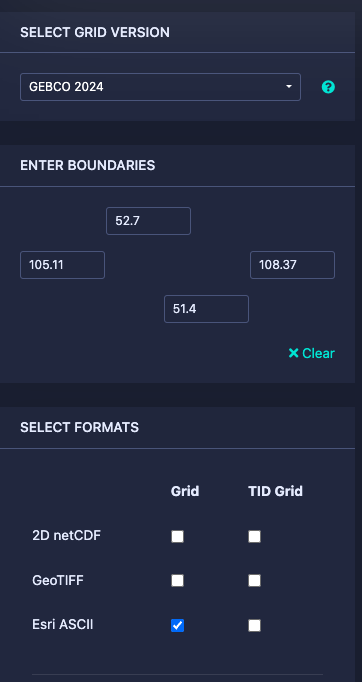
Next let’s download some DEM data for the project here https://download.gebco.net/ you will see a panel to the left with some options like in the image below, select a GEBCO data version, enter the coordinates as 52.7 for top; 51.4 for the bottom; 105.11 for left and 108.37 to the right, that would be enough to cover our AOI. I’ll use a ASCII grid, but Geotiff is also ok. Click “Add to the basket” then “View basket” and download the data.
Sampling a grid
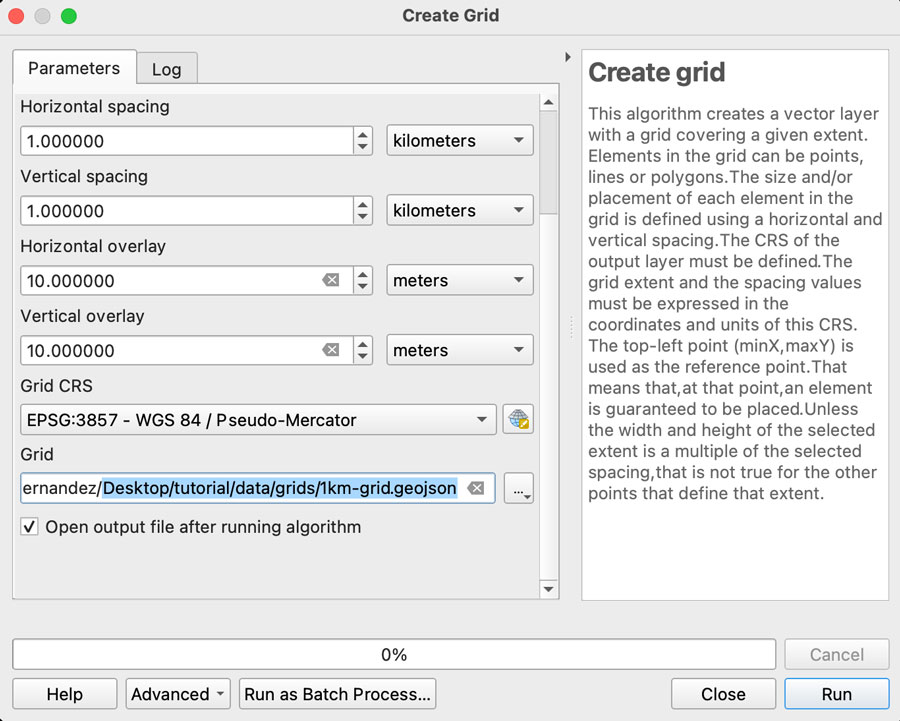
Now we need a grid to sample our new base, in QGIS go to vector/research tools/create grid. That would give you a pop-up window, select Rectangle for the option “grid type”, on grid extent use the drop-down menu to select the AOI layer we created earlier:
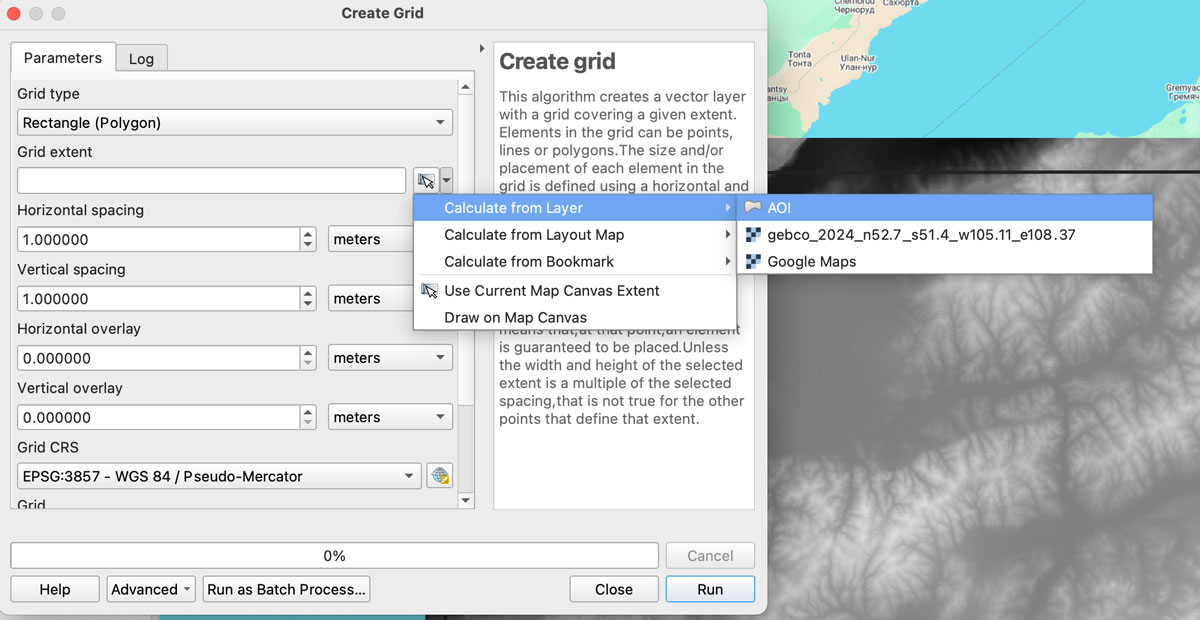
We want each rectangle to be 1km wide so select “Horizontal spacing” as 1 “kilometers” using the drop down menu, the default is 1 “meters” if you are using a EPSG:3857 projection. Do the same for the “Vertical spacing” option, we want squares of 1×1 kilometer.
Finally, we want some overlapping to prevent gaps in the render, so add “10” meters to the Horizontal and Vertical overlay.
Keep the CRS as the default EPSG:3857 and save the grid as a geojson using the dropdown menu option, your panel should look similar to this:
Once you click “run” after a few seconds an army of squares will fill-out your AOI, if you can see them, go to the menu Vector/Geometry Tools/Centroids to create points that would sample our DEM data. In the input layer choose the 1km-grid file we just created and leave the rest as it’s, that would give us a bunch of dots in the center of each square in a temporary layer.

Re-project the data
To extract the data samples, we will to make the GEBCO layer and the new centroids in the same projection. I’m using a pseudo-mercator projection EPSG:3857. But you can use whatever you prefer, just make sure both layers have the same projection.
GEBCO default projection is CRC84, is you are not sure what you layer projection is double click the layer and selection “source” that would show you the projection. If you need to change it, click the layer name, go to the menu Raster/Projections/Warp and create a temporary layer using EPSG:3857 as target, or what ever your preference is.
Sampling the new grid
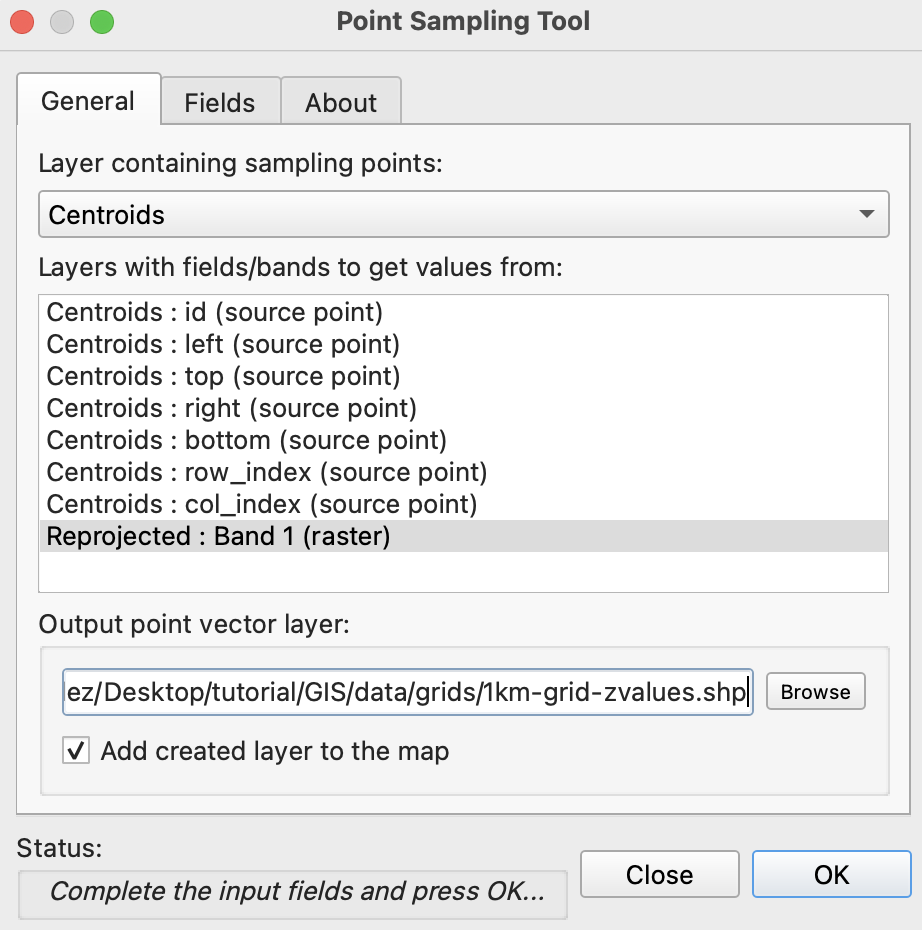
We will use a plugin to sample values from our raster into each dot, if you have the Point sampling tool plugin you’re ok, if not go to to the menu “Plugins/Manage and install…” click on ALL in the left panel and type “Point sampling tool” in the search field, install the plugin and close the Manager window.
To run de plugin go to the menu Plugins/Analyses/Point sampling tool in the pop-up window, select the centroids with the dropdown menu, and in the lower field click the GEBCO layer, finally click on Browse and navigate to your project folder and name the result file 1km-grid-zvalues.shp using the shapefile option there.
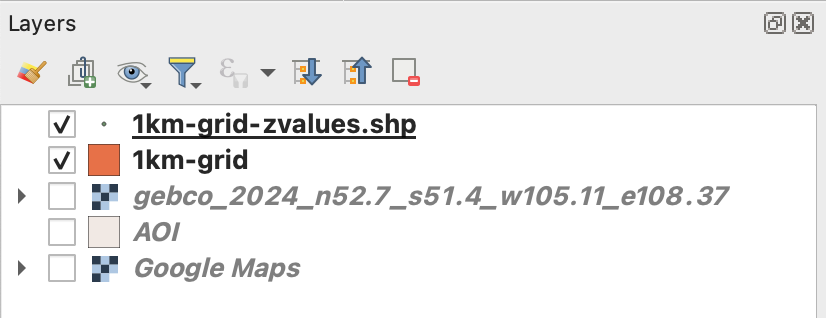
Once you executed the plugin, remove all temporary layers, you should have a layer with the new dots named “1km-grid-zvalues.shp” one layer with our 1km-grid, the AOI layer and the xyz google map layer.
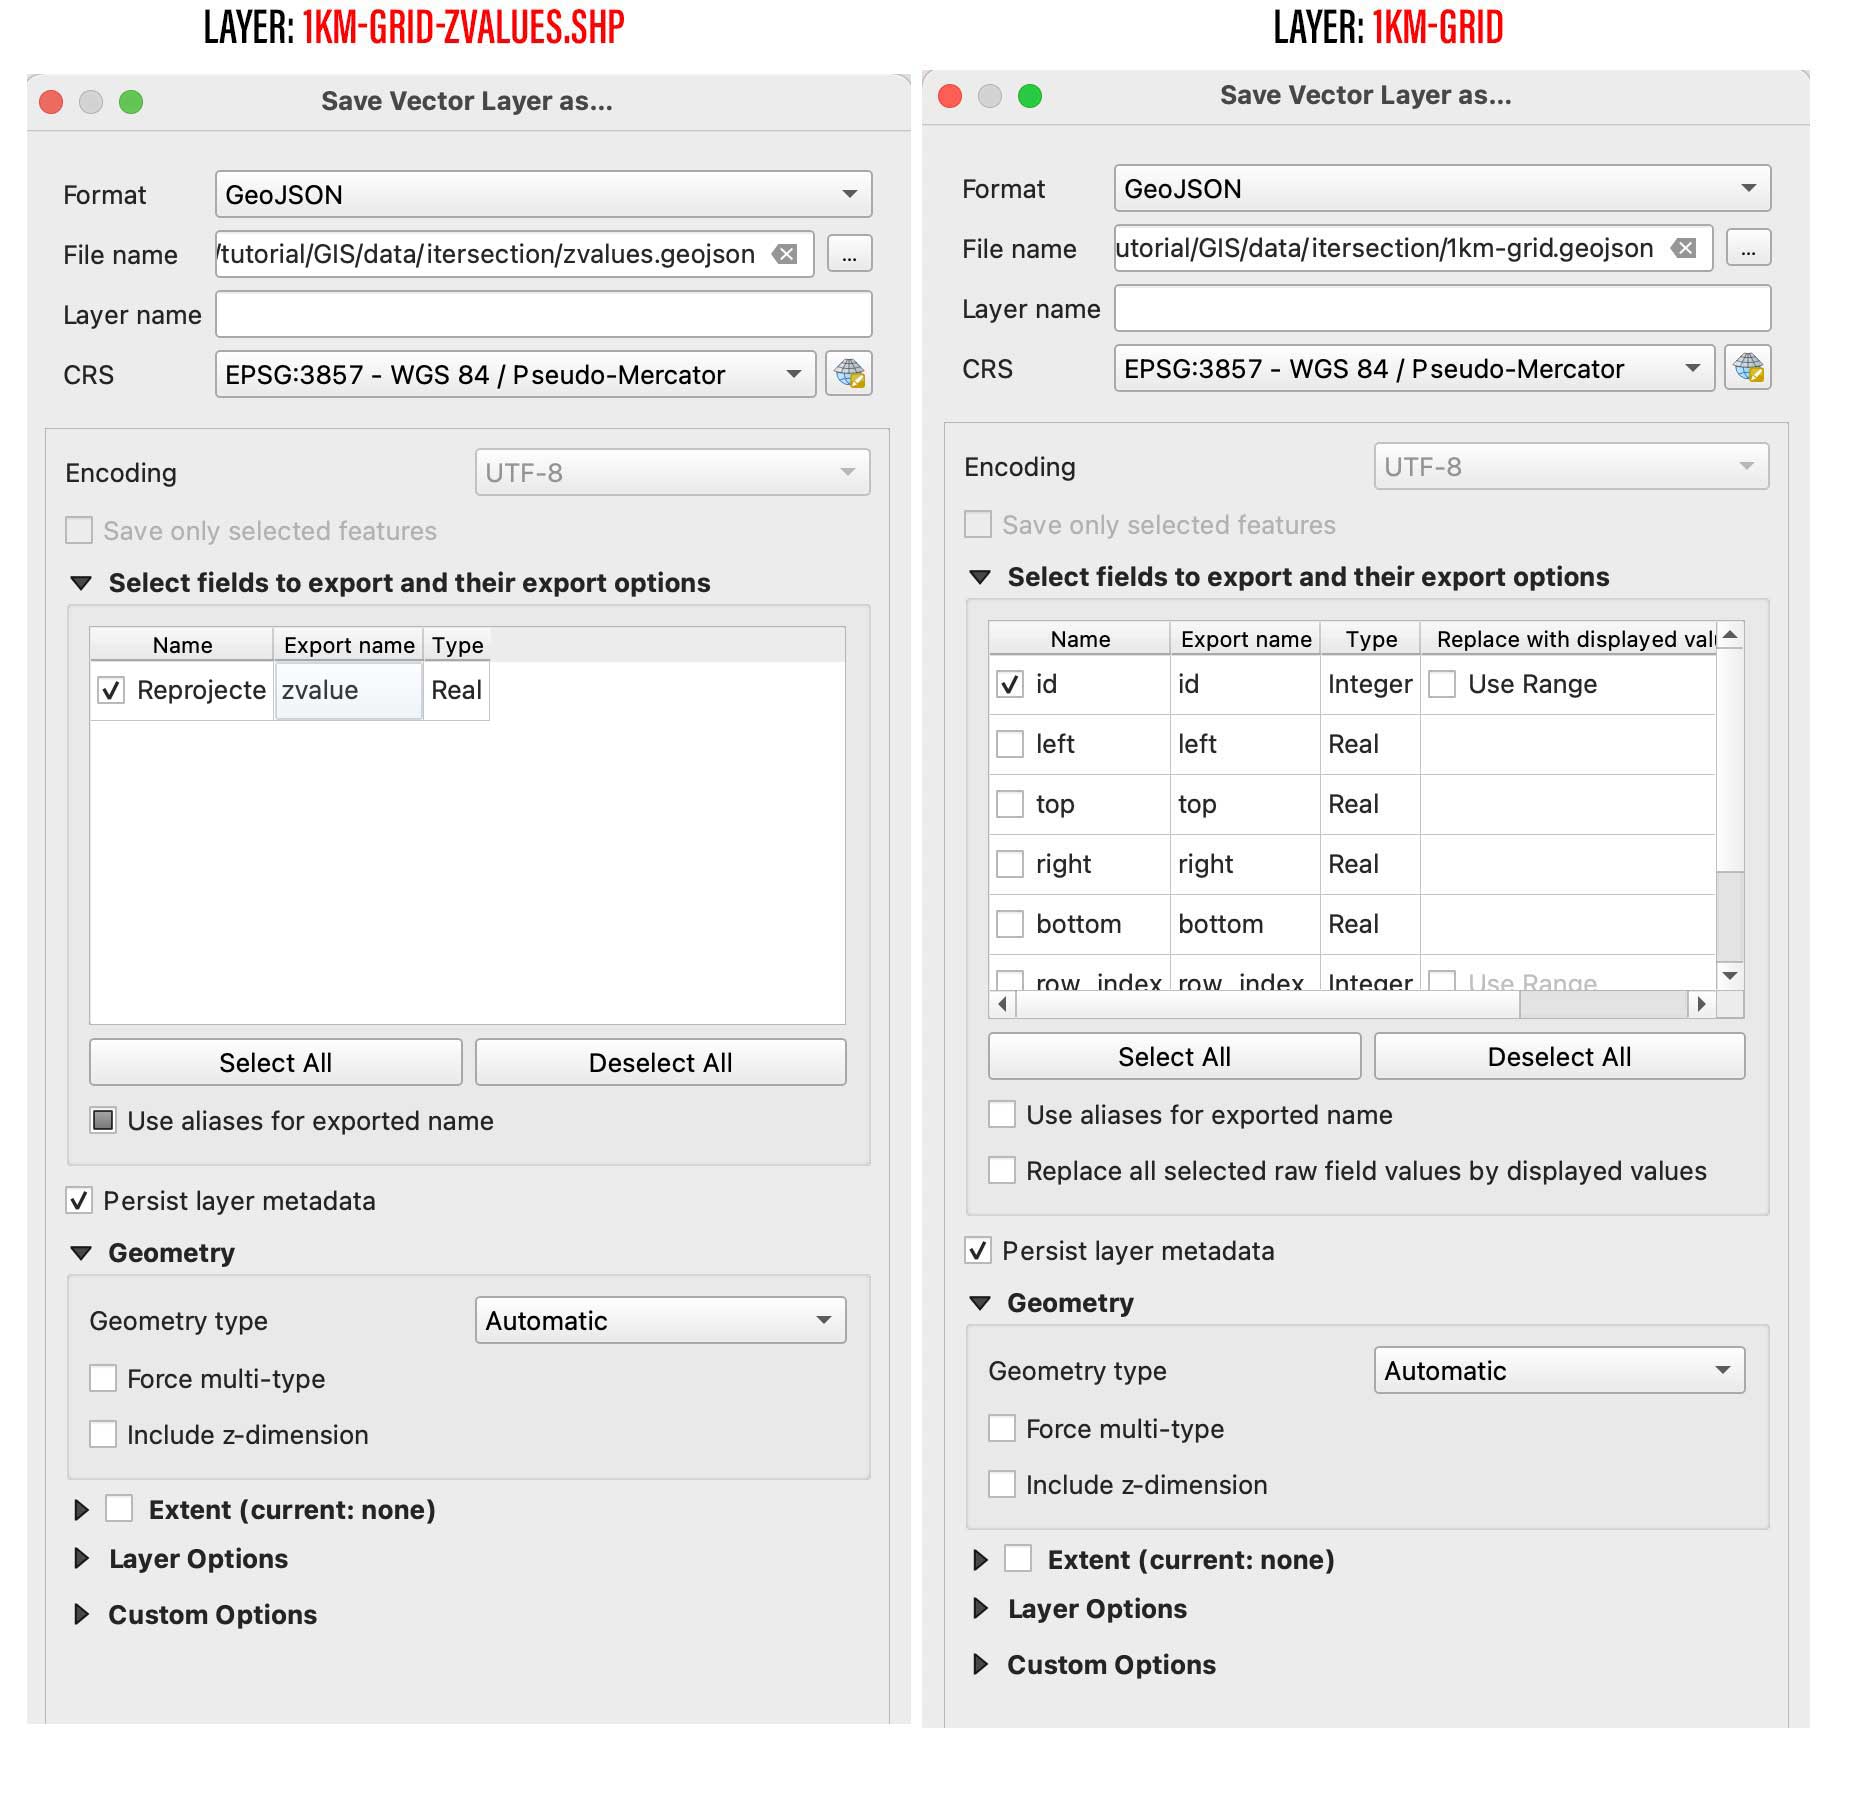
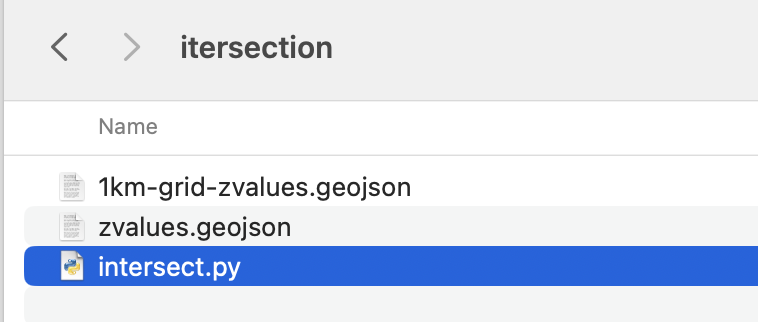
Next step is to create a spatial join, basically we will take the value of the dots to be the z value of each polygon in our 1km grid. You can use the QGIS join function from the menu Vector/Data Management Tools/Join Attributes by location, But be aware that would take a little while to process. I recommend to use a little custom python script instead. But to use it, you would need to export our 2 data layers out as geojson files, right click on them and select “export as”, while doing that you can turn off all the fields but the ID in the 1km-grid.
Save them into a new folder, I’ll call mine “intersection” and place this script next to it, name it whatever you like, but use .py so you can run it from your terminal window as ” python intersect.py “
import geopandas as gpd

# Load the geojson files
zvaluesLayer = gpd.read_file('zvalues.geojson')
grid_layer = gpd.read_file('1km-grid.geojson')

# Ensure both layers have the same CRS
if zvaluesLayer.crs != grid_layer.crs:
    zvaluesLayer = zvaluesLayer.to_crs(grid_layer.crs)

# Check if 'zvalues' field exists in zvaluesLayer
if 'zvalue' not in zvaluesLayer.columns:
    raise ValueError("The 'zvalue' field is not present in zvalues.geojson")

# Perform spatial join
joined = gpd.sjoin(grid_layer, zvaluesLayer[['geometry', 'zvalue']], how='left', predicate='intersects')

# Remove duplicated features
joined = joined.drop_duplicates(subset='geometry')

# Save the result to a new geojson file
joined.to_file('1km-grid-zvalues.geojson', driver='GeoJSON')
Remember you can run this file from the terminal using the commend ” python intersect.py ” while in the folder we just created. Once you run this script a new file would be created next to the script, look for 1km-grid-zvalues.geojson and drag-and-drop it into QGIS.
Style your new grid
You would only need this new files we just created and the AOI layer, remove the rest of the layers if you like to have a clean panel before to continue.
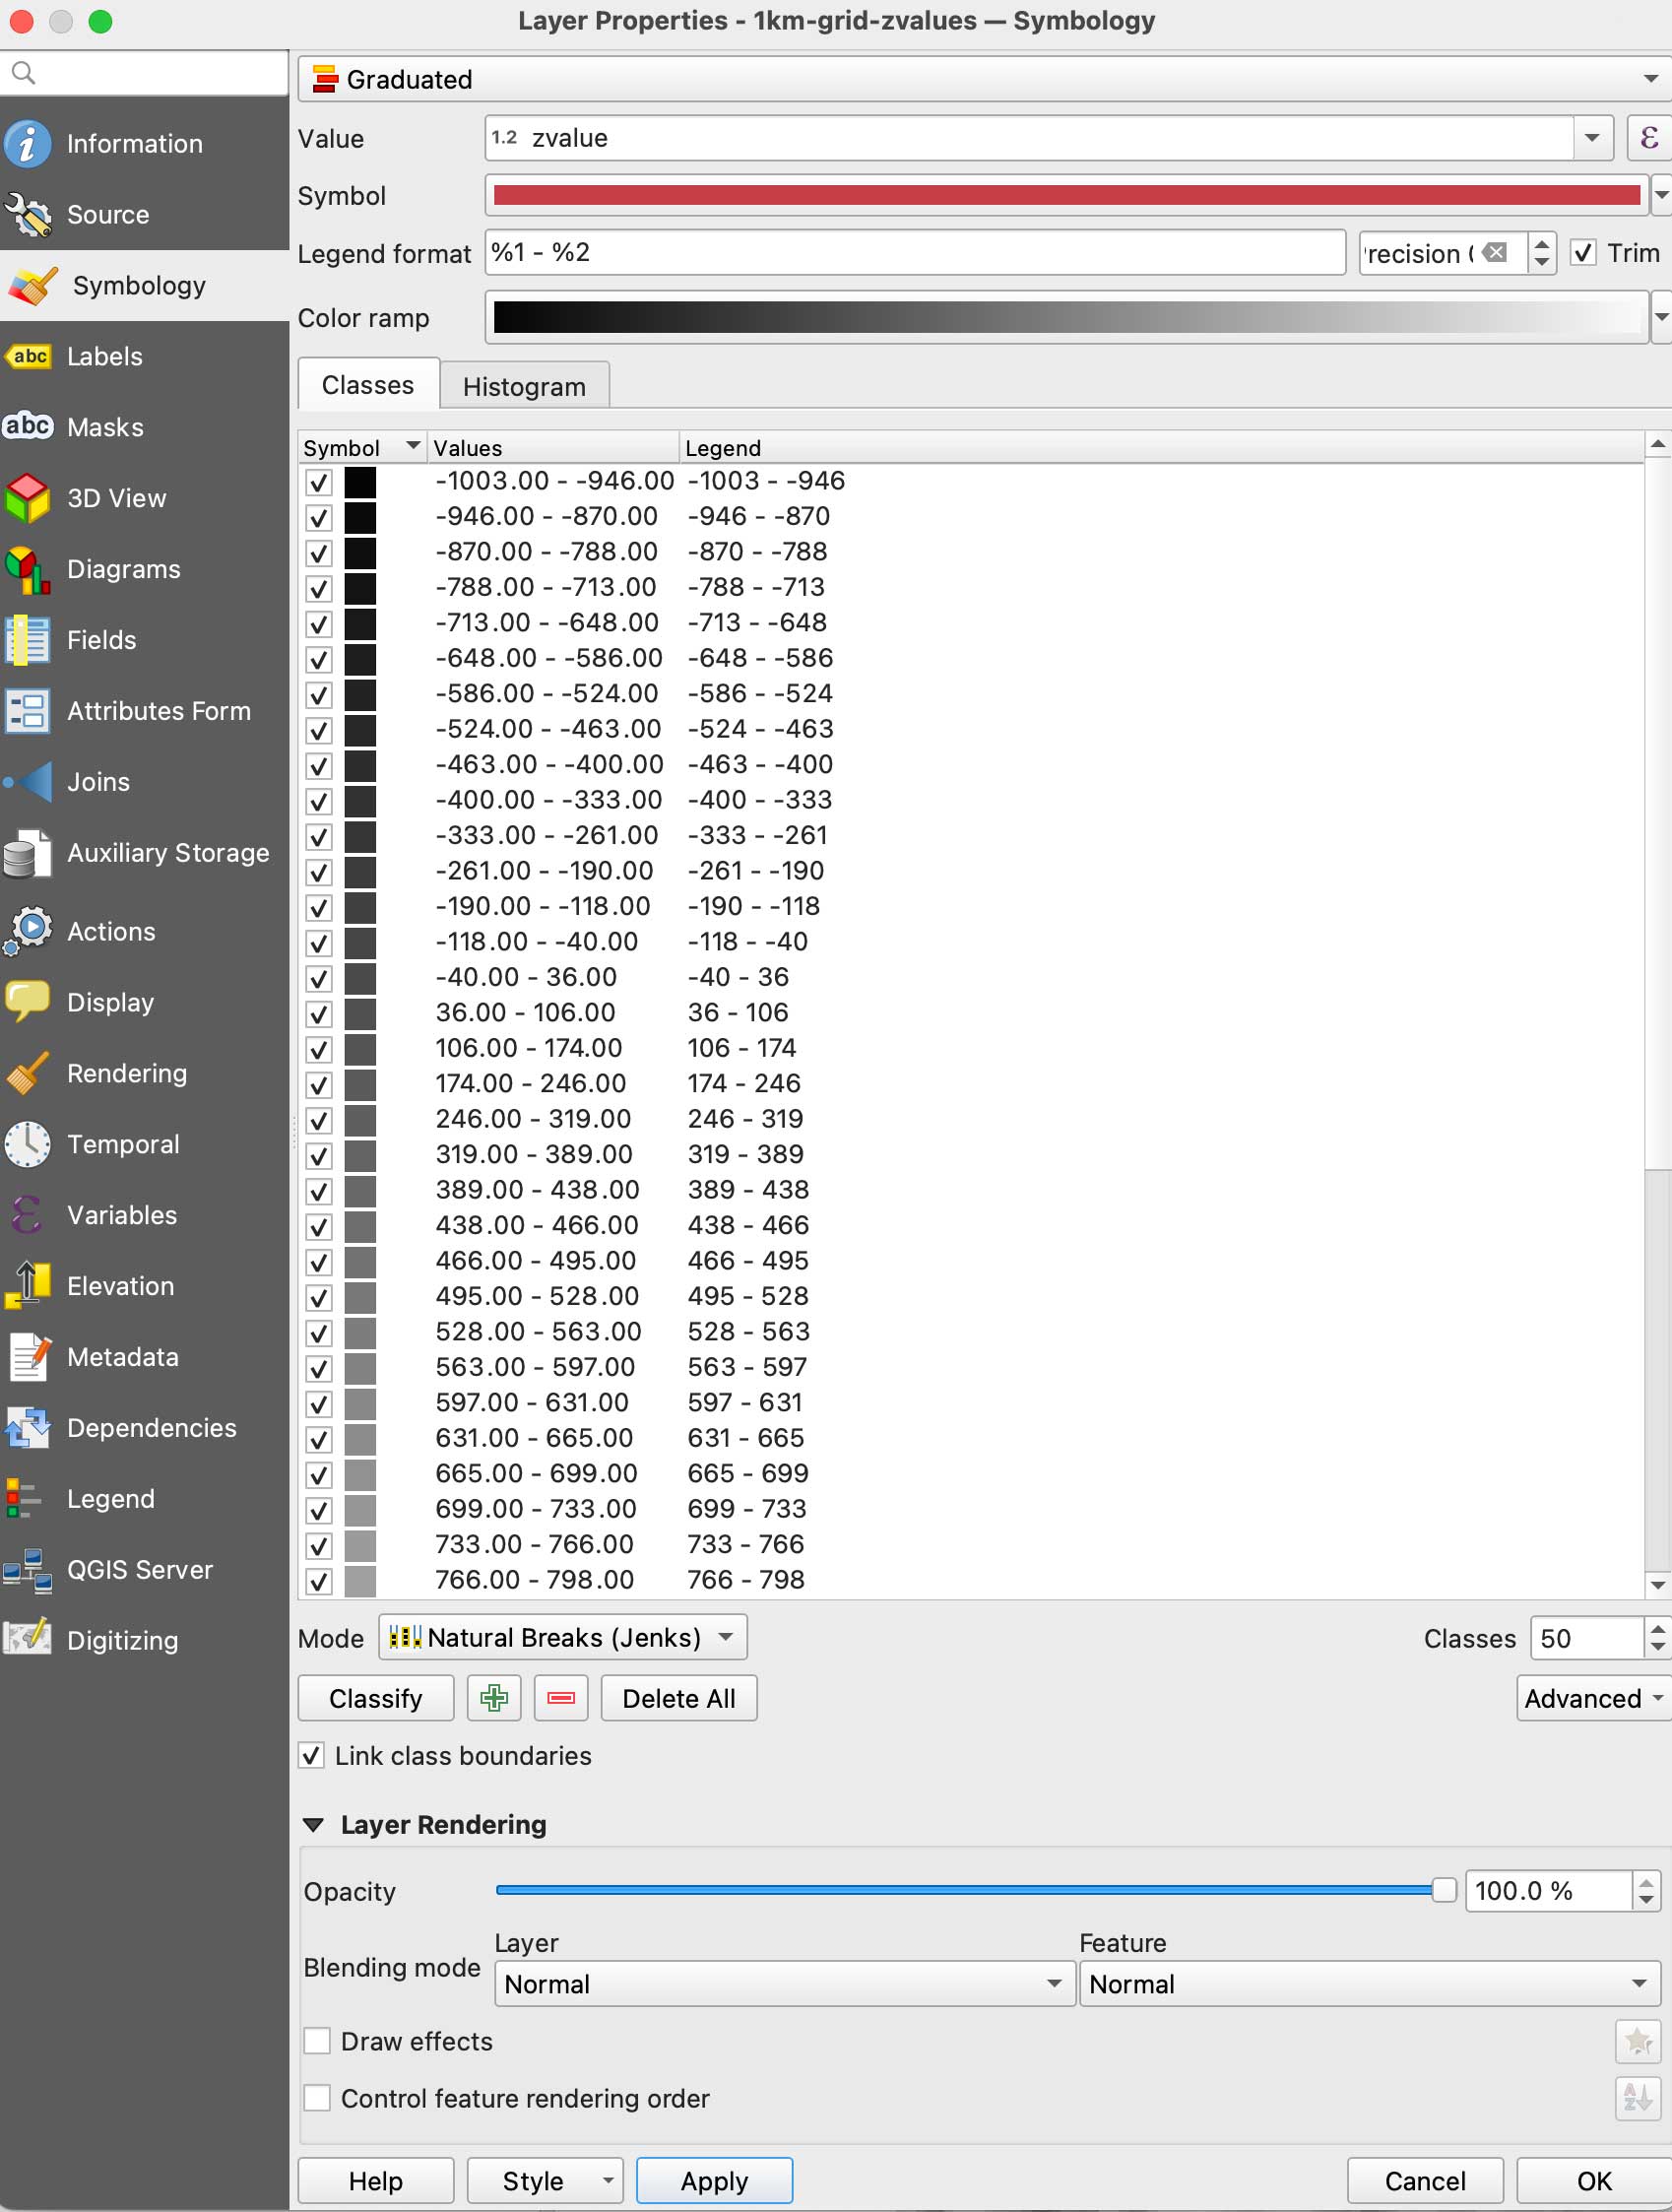
Double click the new 1km-grid layer, go to symbology and select Graduated in the top panel, set it to gray scale, use the mode natural breaks with some 50 classes, in the Value field pick zvalue and click apply. (be sure the negative values are assigned to black, if they are on white invert the ram using the dropdown menu.
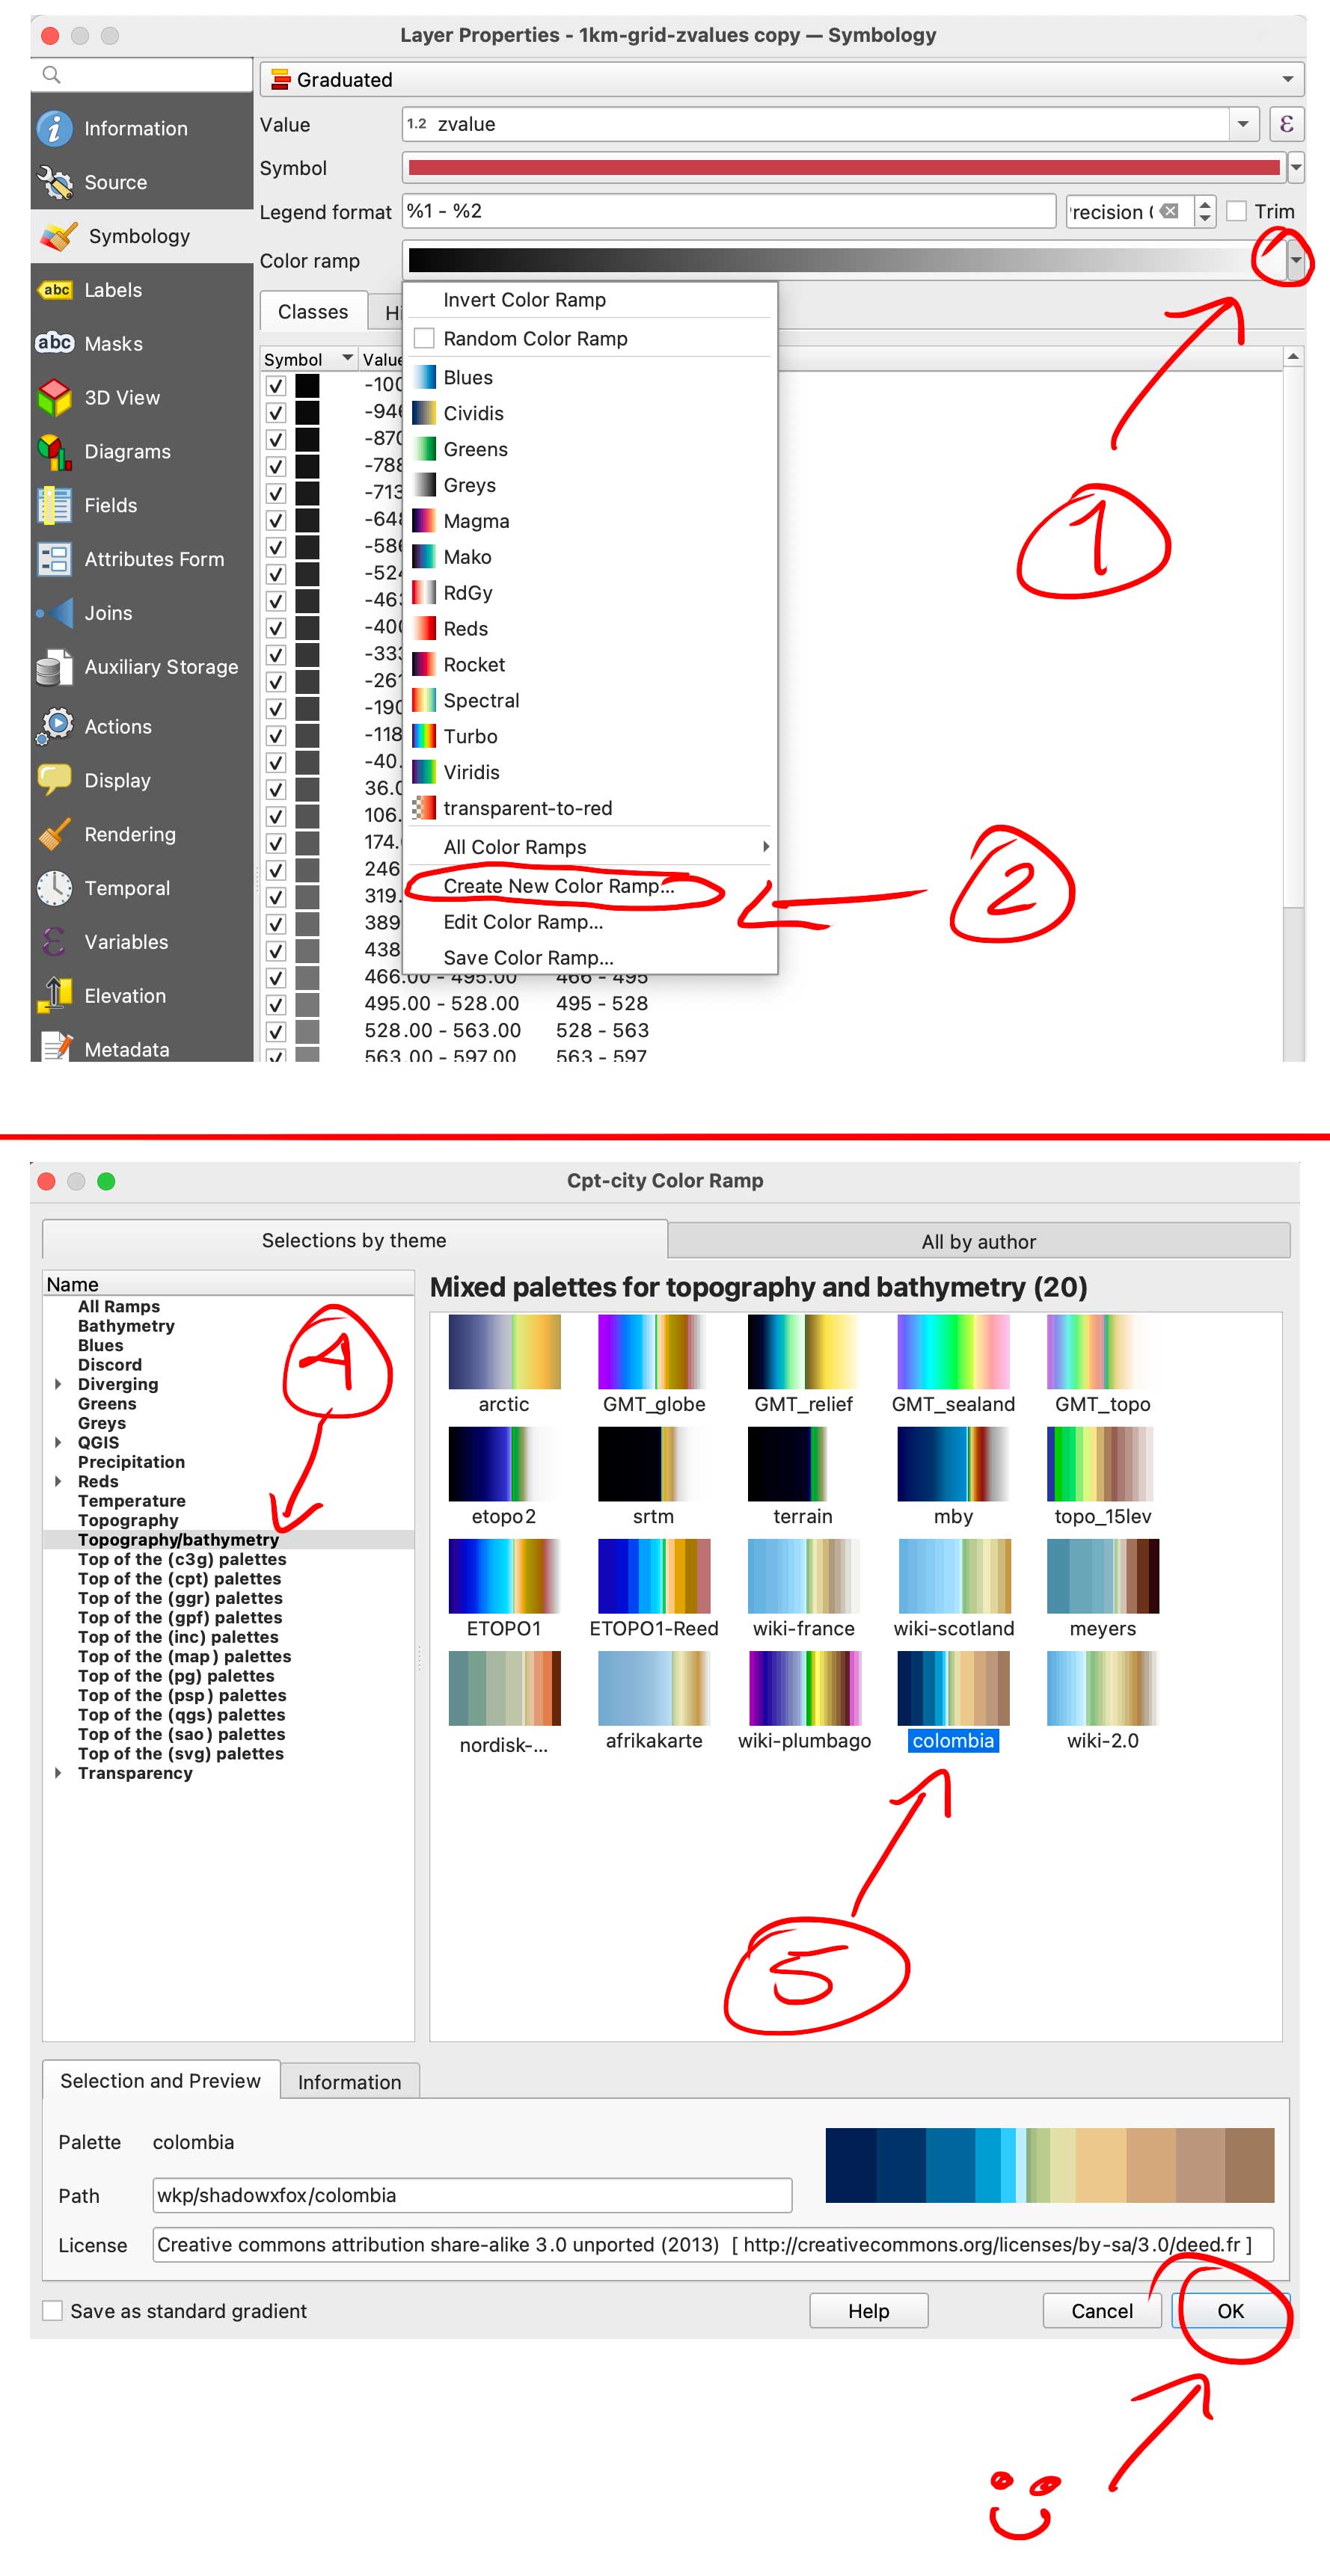
We are almost there with data process, here comes the fun part. We need basically 2 layers of data, this black and white layer we just created will serve as base for terrain, create a duplicate of it to make a color layer.
Double click that copy and go again to Symbology, but this time in the color ramp menu select “create a new color ramp, in the pop-up window you will see a few options, change it from gradient to “Catalog: cpt-city” and click ok. Navigate to Topography/bathymetry and select “colombia” that’s a blue-green-brown pallete that would assign a color range to differentiate our terrain from the lake.
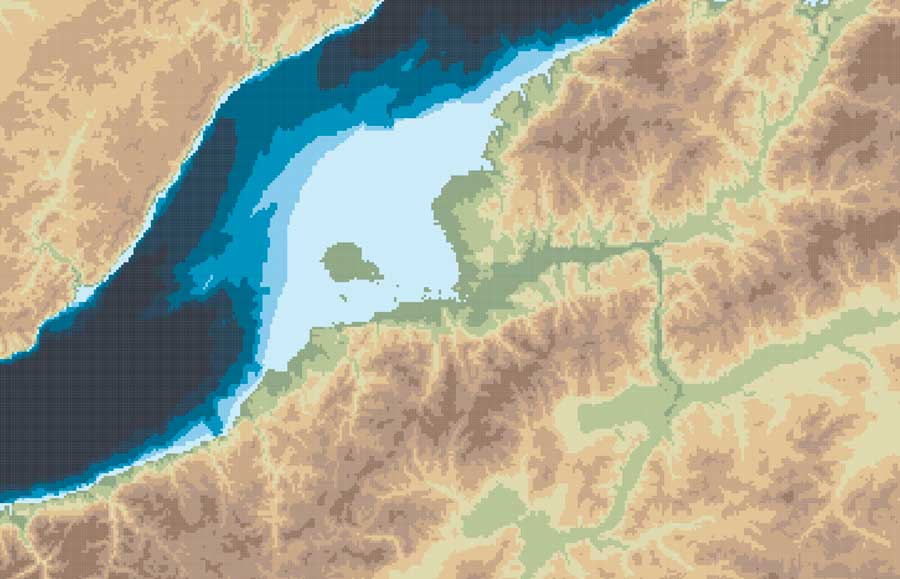
You can also create your own gradient and make the value ranges as you like if you want to ink all the water blue for instance, but for the purpose of this exercise all keep the same classes and set up as we did for the BW image. (50 on Natural Breaks). You should have now a black and white layer and a color copy looking something like this:
Set up the render
So, here you have 2 options, one is to export tif images out of QGIS to render the tiles, or export a shapefile to be used with the GIS blender plugin.
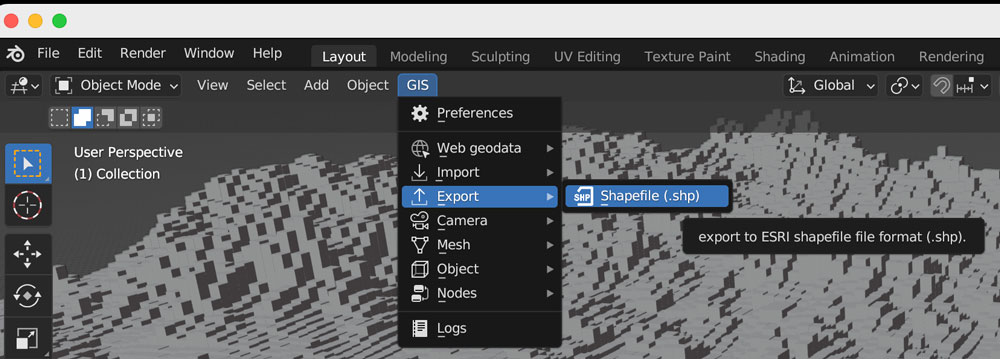
Option 1: Using the GIS plugin
If you are using the Blender GIS plugin, click in your 1km-grid-zvalues layer, choose export and select ESRI Shapefile. I have saved a copy of that file in the assets folder, the link is at the top of this page. The follow the instructions here to setup the plugin. If you need a litle more of explanation of how it works, this video has a great walk thru.
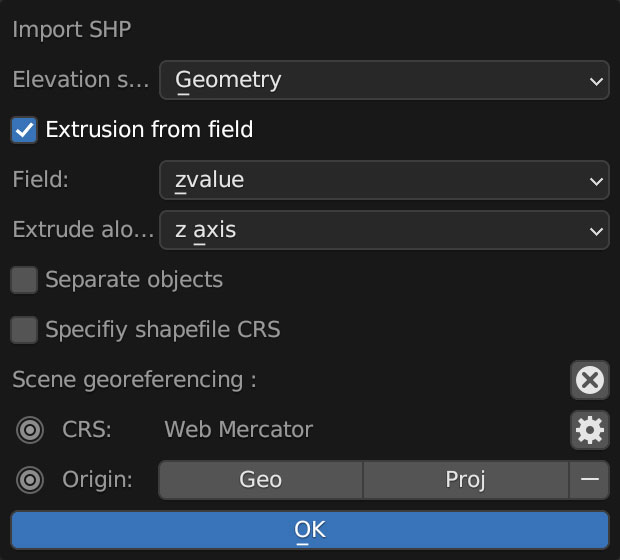
Once you are all set up with the plugin, you can import the shape file using the 3D viewport in object mode, use the GIS option there to get the shapefile in, just brow for the file we exported earlier from QGIS:
A little pop-up window emerges usually near the bottom right of you screen, you should select “extrusion from field” use the drop-down menu to find “zvalue” and apply it to the z-axis, leave everything else off, you don’t want to check “separate objects” because we are using a large scale object with a lot of polygons, that option come handy if you are importing smaller data sets to handle objects individually.
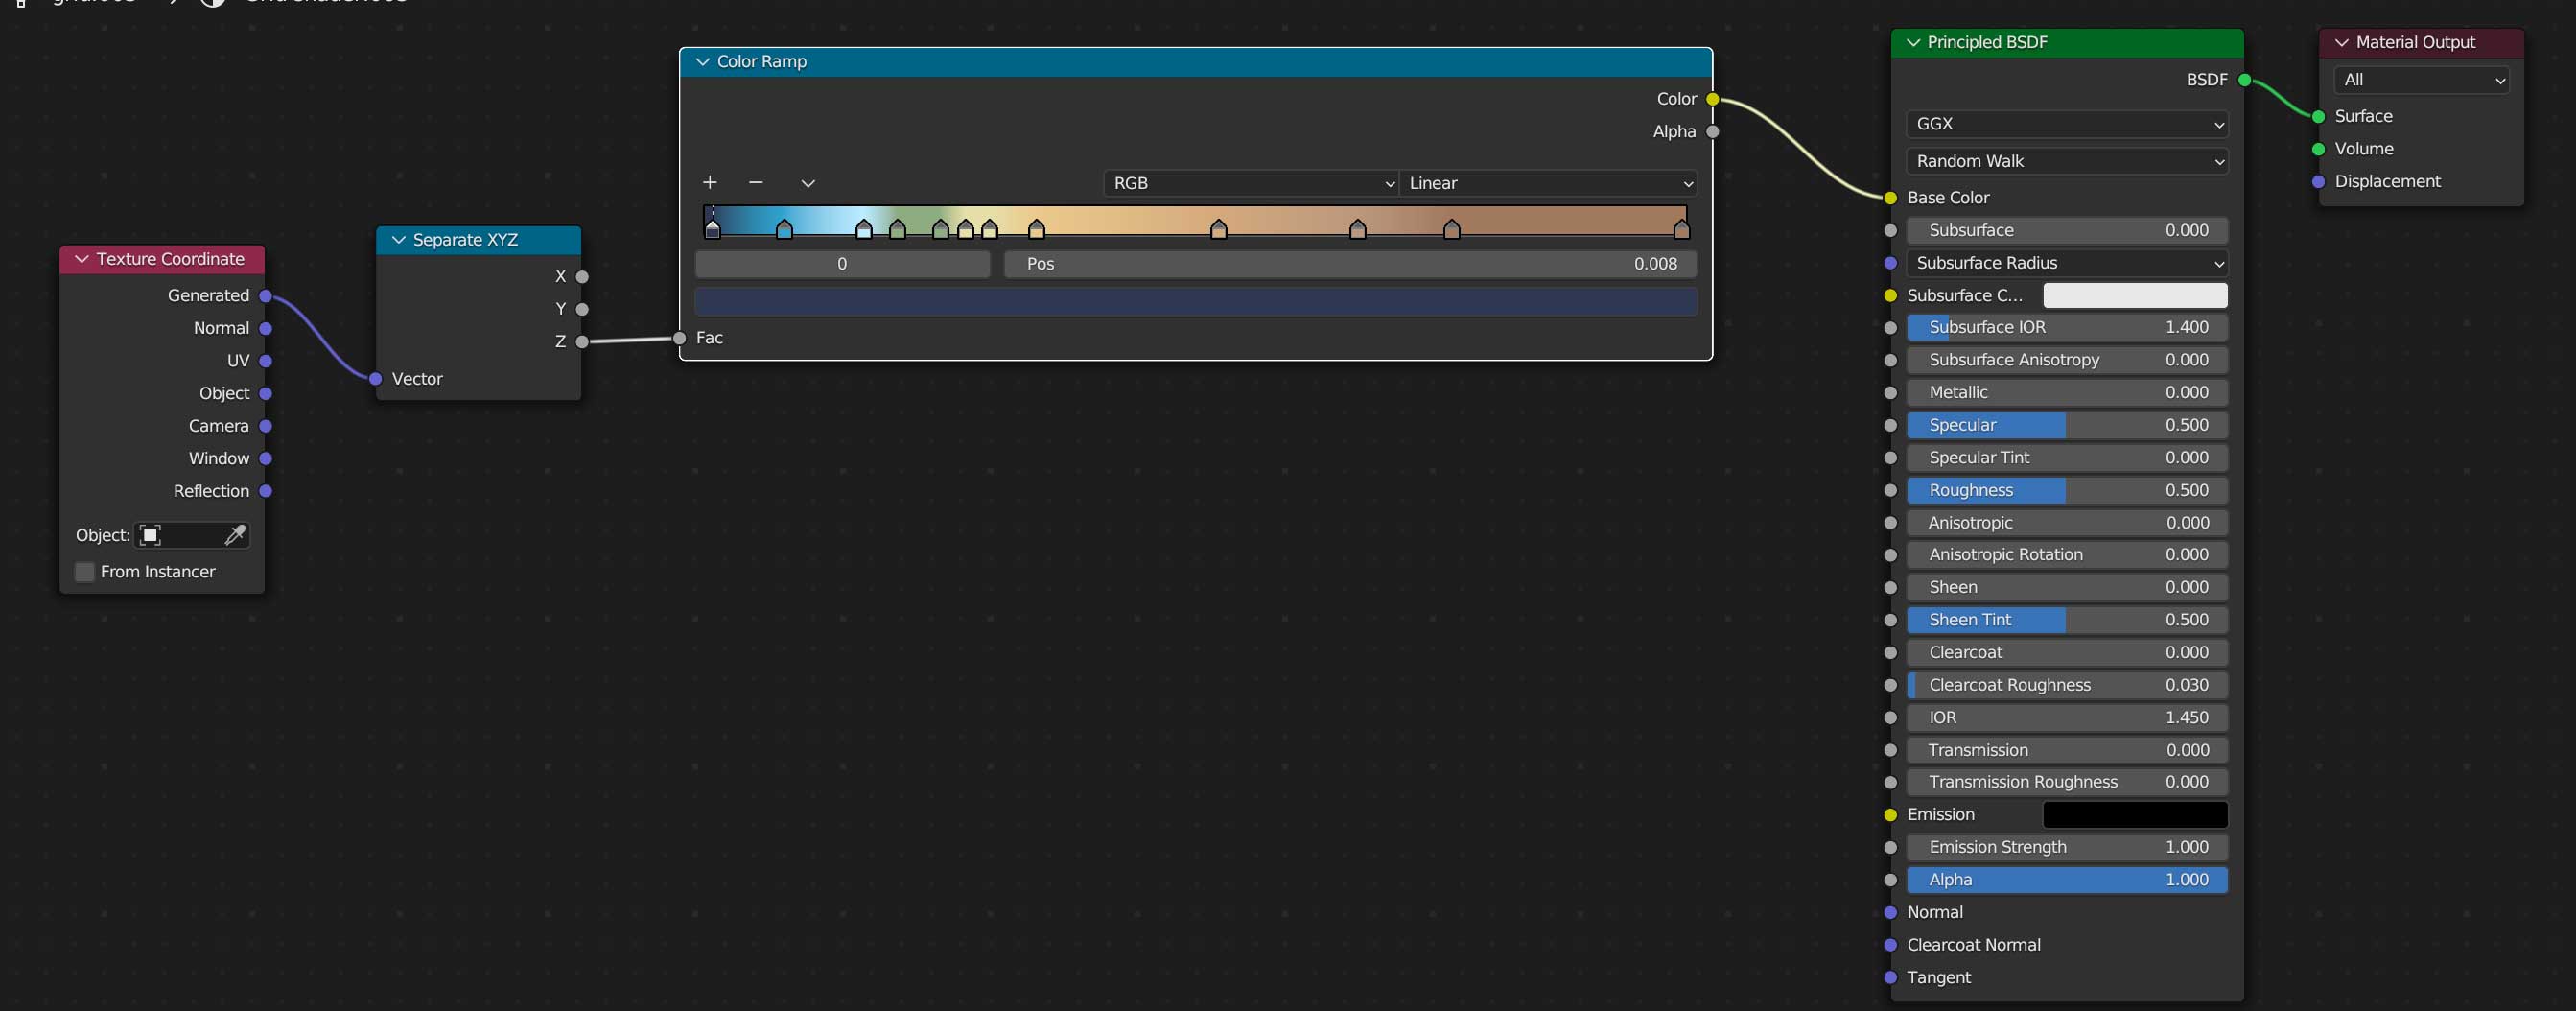
Once you are all set, you can create a new material for our terrain, use the z-coordinates to apply a color ramp, you basically need a “texture coordinate” node, a “z” selector, the ramp, which I basically copied color-values from QGIS, and link all that to the default material, here’s a little visual of the wiring:
Once you added a light on your preference angle and intensity, your render should look like the one below, if wyou want to save some time you can use the demo I left for you, I have there 2 cameras, one perspective camera for a close up, and one orthographic camera to get the whole map. Note that there are also 2 lights depending on what you want to render, but that’s just a personal preference.
Option 2: Using images from QGIS
If you opted not to install the plugin and render images, go to the folder named tiff-based. Let’s get those images out of QGIS first:
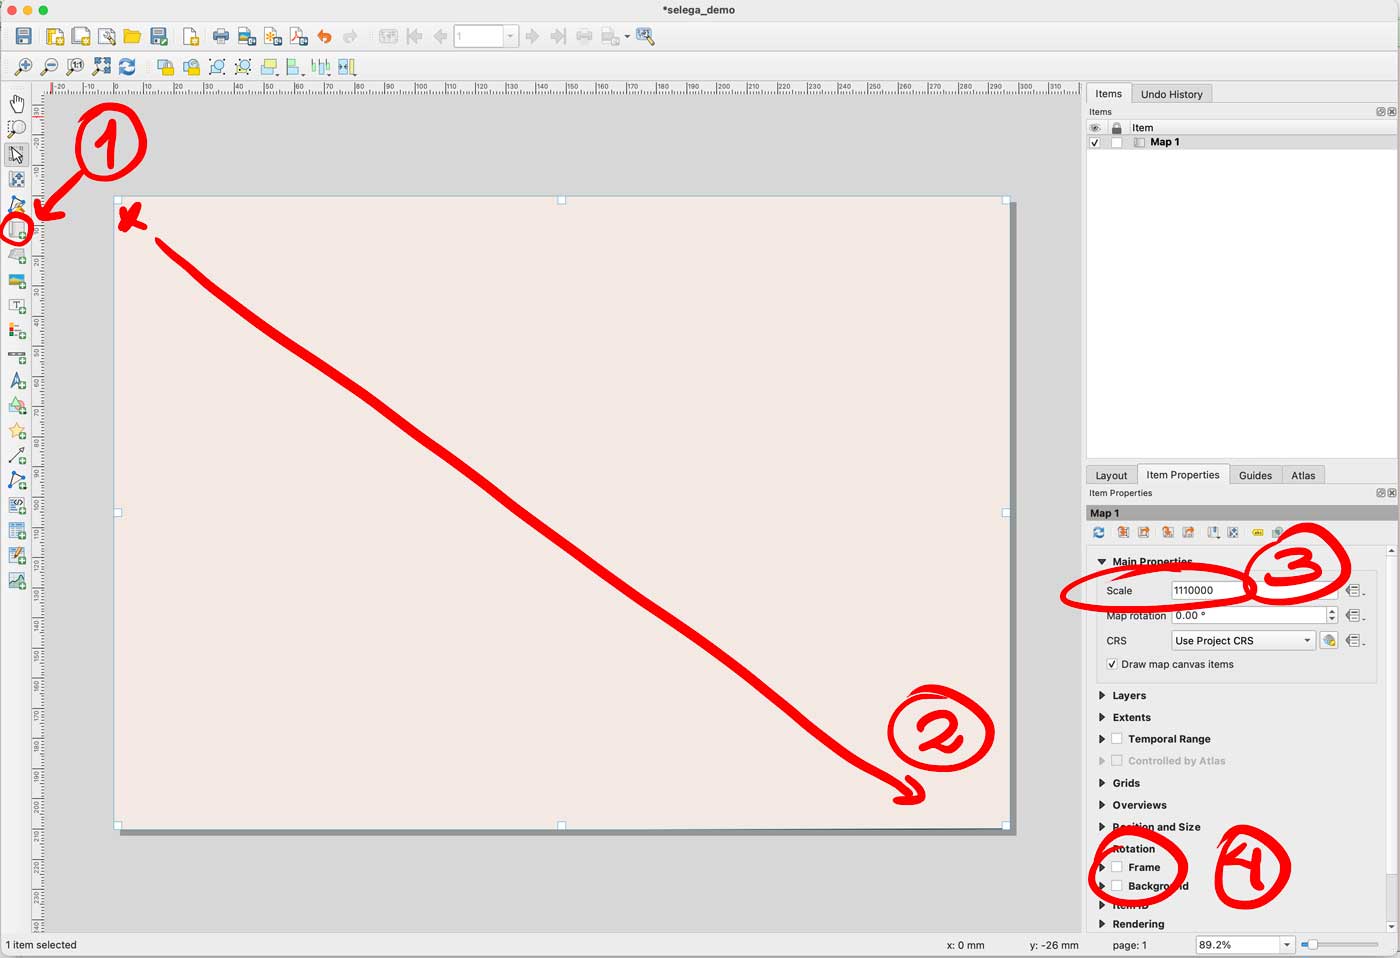
Enable only your AOI layer in QGIS, then go to the menu Project/New print layout and add an xxx name there, I did “selenga” for mine. You would get a empty layout window, select the “new map” feature in the left panel, click and drag in the canvas to create a preview, set the scale to 1110000 and turn off the background and frame options.
That set-up would give you a full end-to-end raster, turn off your AOI layer and turn on the color layer you have there. Export the layer as a tiff image using the picture icon next to the printer in the print layout. The do the same turning off the color, and turning on the gray scale image. Save both files next to your .blend file, i have called them selenga_color.tif and selenga_terrain.tif

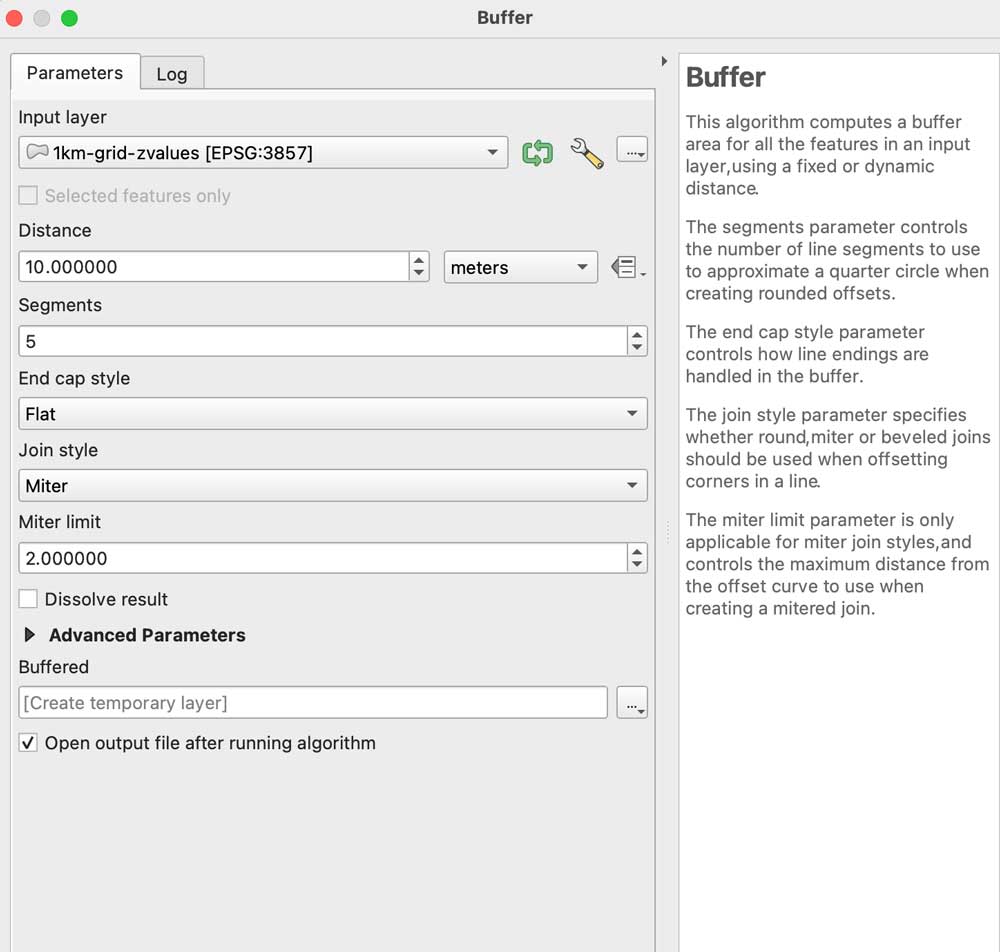
A little trick to prevent weird gaps between the tiles, even if they don’t have gaps the grid effect seems to create lines between the tiles, to prevent that run a buffer clicking the grayscale image, go to the menu Vector/Geoprocessing tools/Buffer add some 10m in the distance field set the caps to flat and miter in a temporary layer:
Leave that layer under your grayscale, copy and paste the styles to the buffered layer, leave that on only for the grayscale image before exporting. I have left both images in the demo folder so you can see the difference on rendering later.
Go to Blender
We are all set, now, go to the blender template. A few things you should be aware first, this blender file uses cycles render engine to get nicer shadows, and its set up to experimental. I’m using v 3.6.4. The print resolution (in the printer icon panel to the right) is the same as the original images we created in QGIS: 4677×3307 pixels. The plane used to load the textures should be scaled to fit those images too, so in the orange icon I have scale X as 4.667 by 3.307 note that’s correspondent to the image physical size. Finally in the camera, I’m using an orthographic camera, click the camera in the collection and then the little green camera icon in the panel below, use the scale field as double the size of the image, you can type there 4.667*2 so your camera resolution matches the plane size as 9.334. Keep that in mind if you want to use another image with different dimension, its all about the original asset.
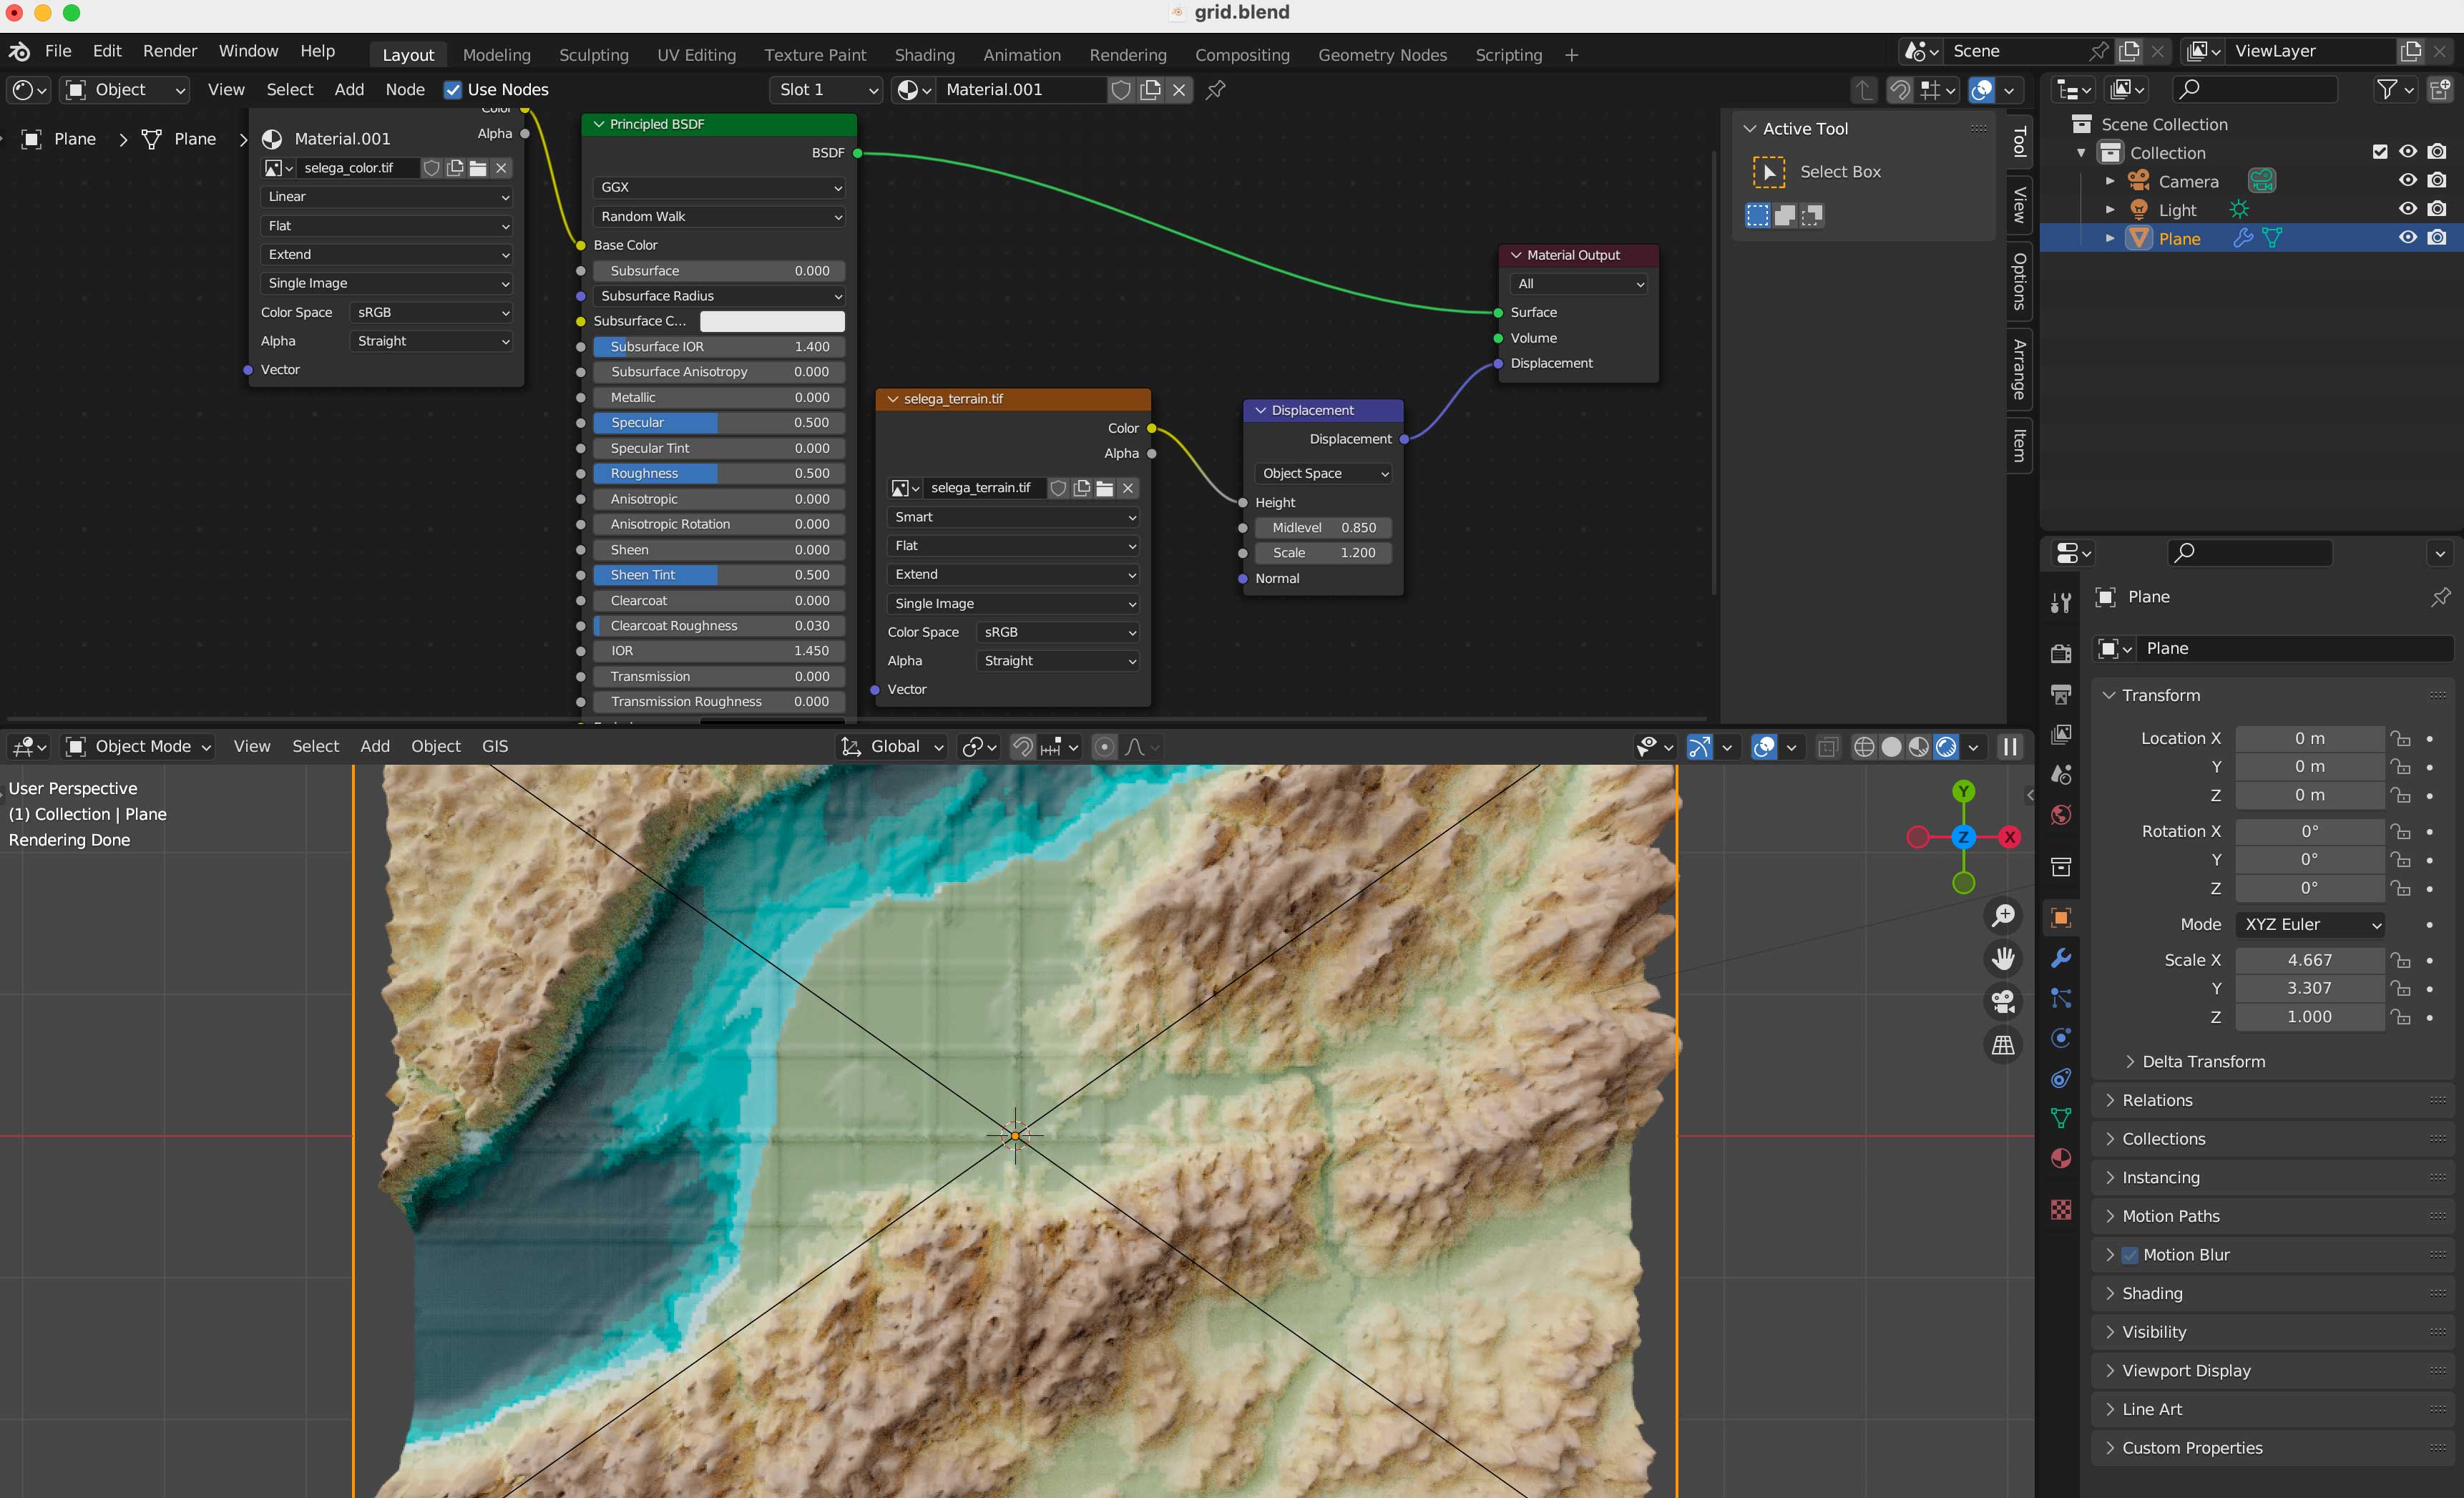
Navigate to the textures folder and replace the color and displacement terrain accordingly in the shader editor.
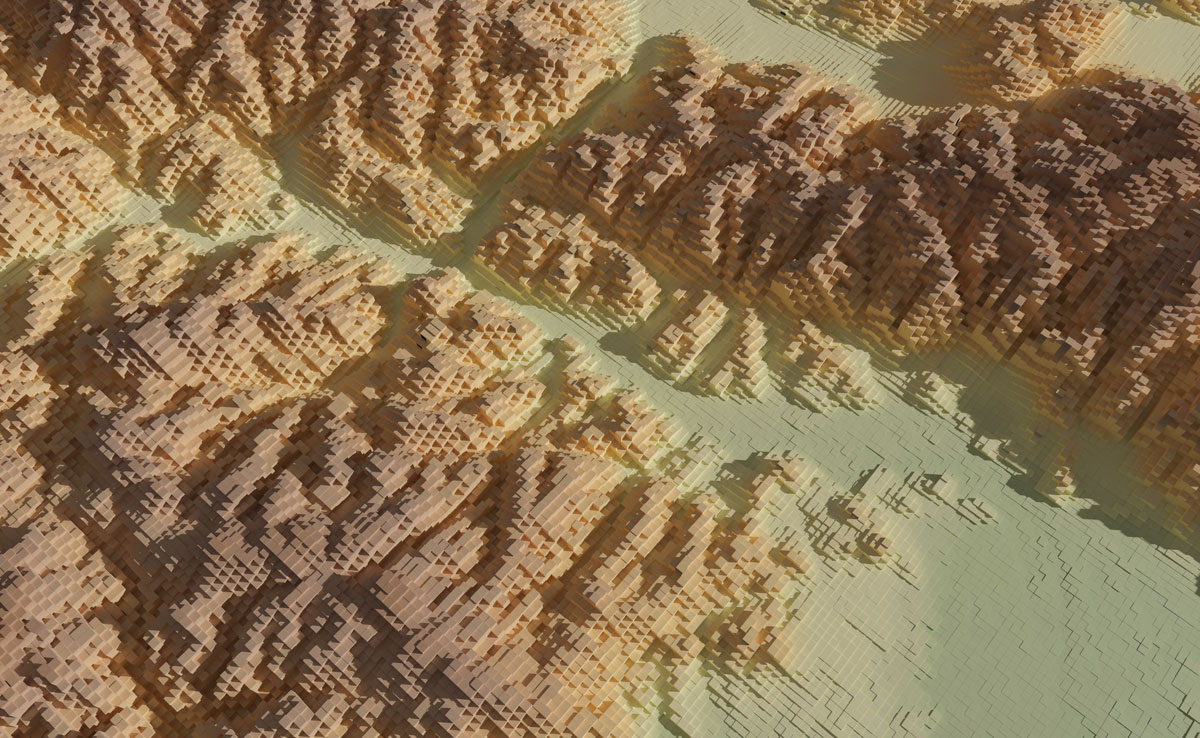
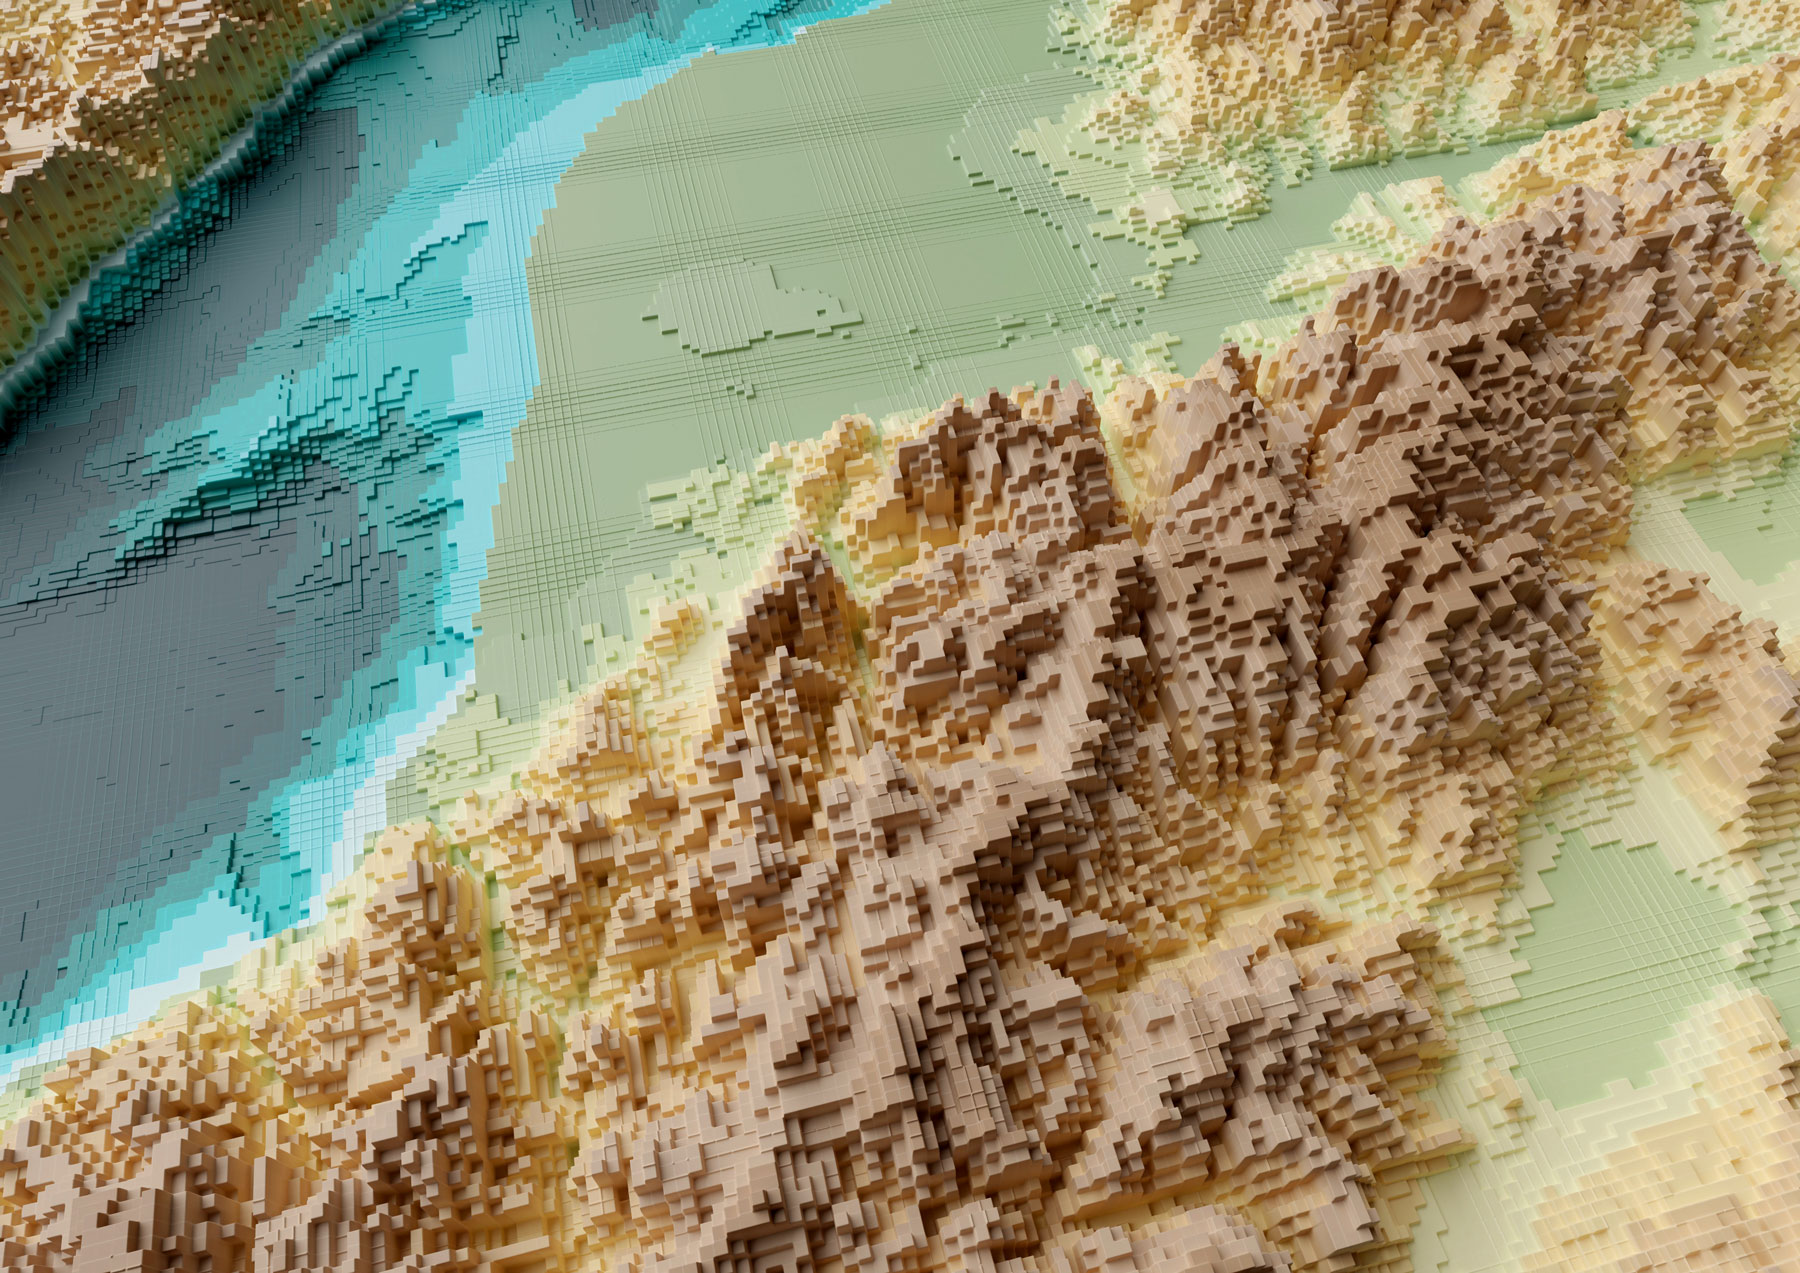
Your final render should look like these using the perspective-camera:
Or this if you are using the orthographic-camera:
Keep in mind I used photoshop to tweak a little the color hues in the original map I did in Fun-tography, I also added labels using illustrator. The nice thing about using the orthographic camera is you don’t loose the georeference from QGIS, so if you export labels from there you will get them in the accurate position into illustrator, Inkscape or any other software you use to add vector details on top of the renders.
I hope you can create beautiful maps, go crazy and do taller columns, play around with the color ramps… have fun!
Even if you don’t use this complex approach, you might gain experience familiarizing yourself with super powerful tools like QGIS and Blender.
Happy mapping!